Tuesday, 22 April 2014

White with Mint April Challenge


ww1 mint

Off to camping I go with my scrapbooking supplies, actually organised this time, planning what photos, layouts and challenges I wanted to do and packing what I needed (well mostly, what I did forget either my scrapping buddy had or I created.) Nothing better than being out in nature surrounded by scrapbooking  and great friends. 

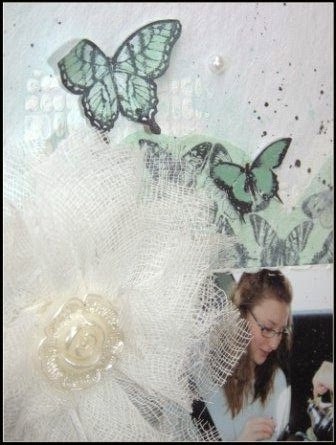
I've been waiting for the right layout to use this photo in and even thou my daughter isn't a fan of butterflies I loved the idea of using them to represent their free thinking and spirit they both share.

Anyone for tea. Bec and Kaity had just brought a tea set and whilst waiting for us mums who were taking their time in the supermarket decided to have a tea party in the back of the car.


The background comprises of stencilling with gesso, one layer from a butterfly love heart serviette cutout and added to the page using gesso under and over the serviette. Prima flowers that were painted with mix of mint acyrlic paint and butterflies that were stamped with StazOn and then painted with the same mint paint watered down. I painted some card letters I had cut out through my BigShot machine and Kaszazz lettering stencil with mint watercolour and edged with a journal pen.

I attached  a crystal  onto a bronze embellishment  and then onto a small mint doily. Other additions to create texture were small pieces of cheese cloth around the photo and doily and a handmade flower; made with small squares of cheese cloth glued onto a cardboard circle and then finished off with a white pearlised rose button. To finish the layout I splattered mint and black watered down paint and placed white pearls around.



Thanks for checking out my White with 1 challenge blog entry for April.


Wednesday, 16 April 2014

Jute BagTutorial.


Hi this my first tutorial so I hope you find it helpful and it inspires you to try something a little different.
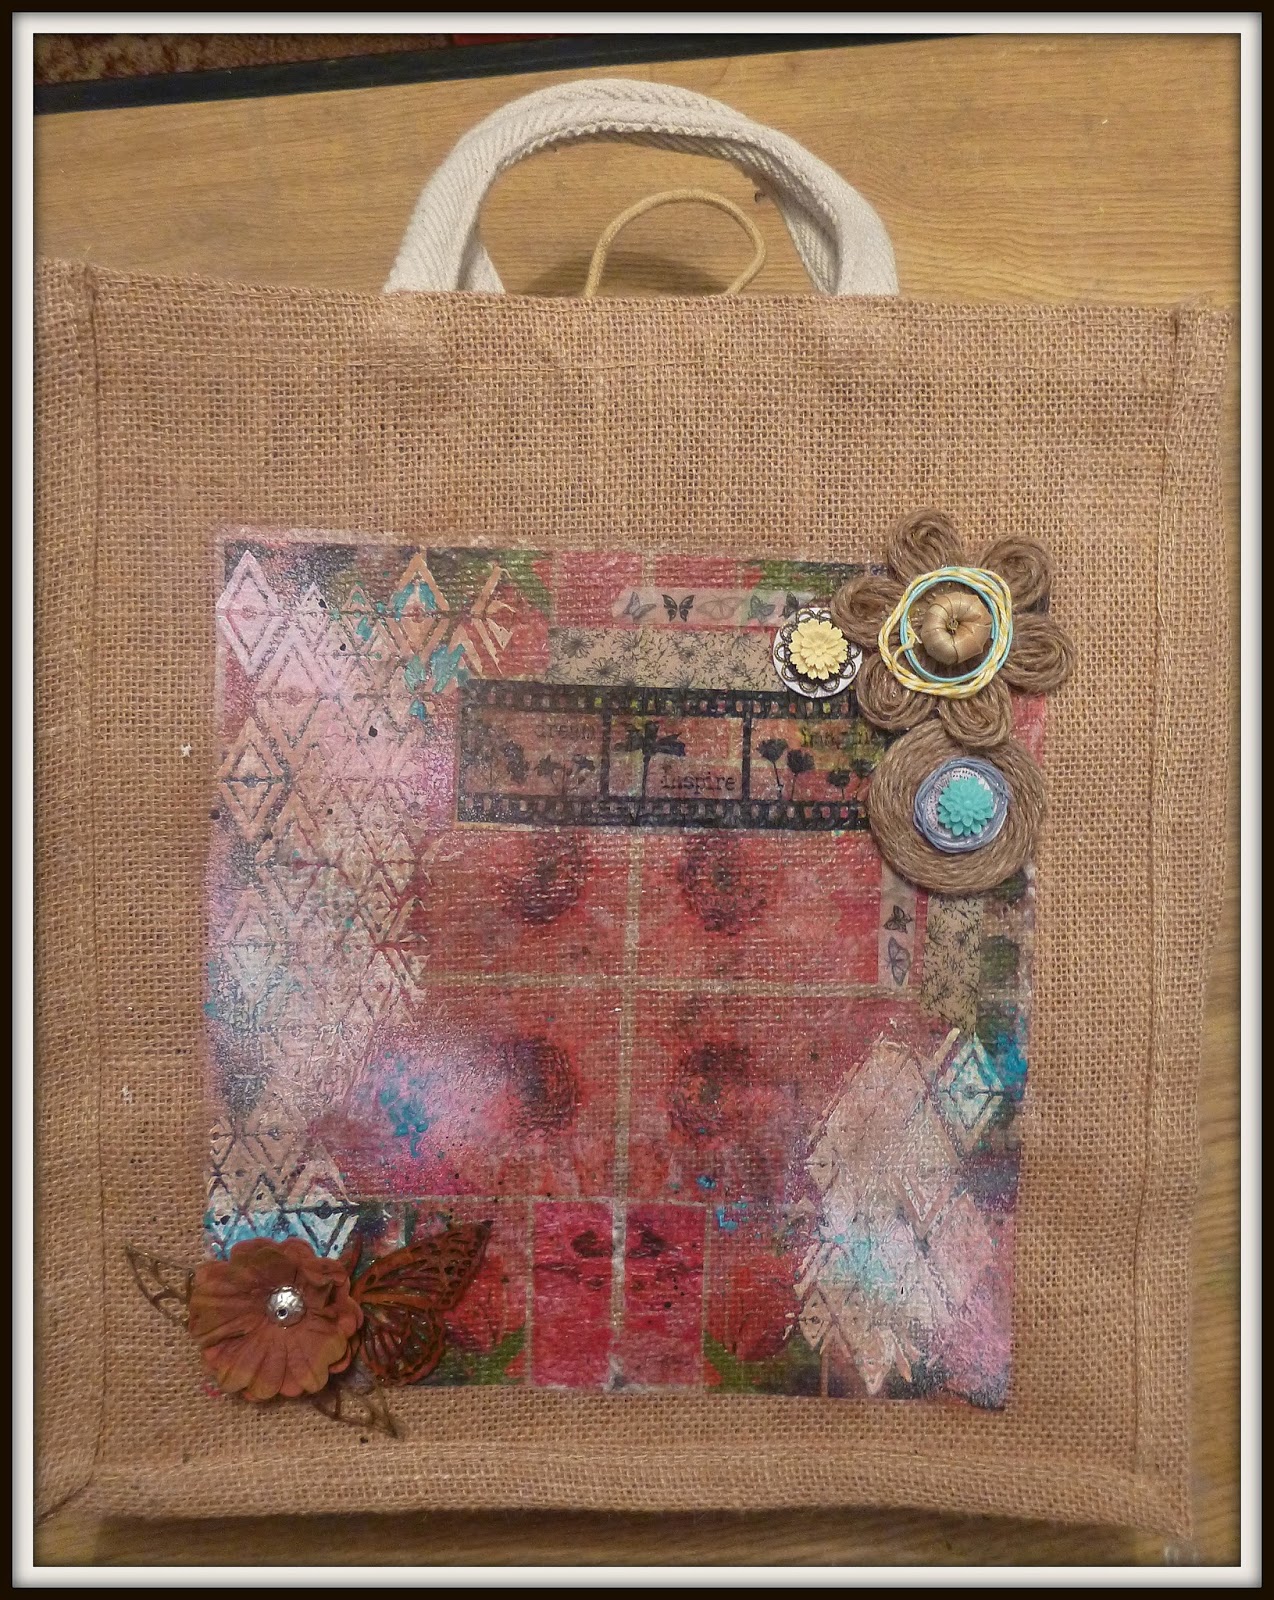
I have been experimenting with using serviettes in my layouts lately after a friend of mine gave me a bag she had given me for christmas ( coffee and cake serviette jute bag).  I thought I could use this idea and apply my love of scrapbooking to it and this is what I came up with.

 
What you need to start: A jute bag from a supermarket, serviette, Mod Podge, paintbrush, large plastic bag with a flat board (I used a A4 cutting mat) to place in the bag to protect sides from sticking together.


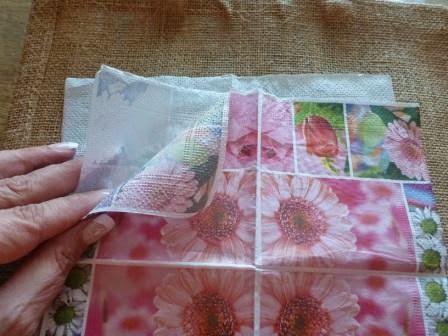
Seperate the serviettes layers, you only need the top layer.

Use a paintbrush to brush a line of mod podge over the jute under the serviette, carefully brush mod podge over the top following the section you have already done underneath using a light strokes. Holding up the serviette continue to brush mod podge under and then lower to brush more over the serviette ( moving the brush towards top edge works best). 


 Continue with mod podge until serviette is totally covered. Remove the plastic bag ensuring bag stays open while you leave the bag to dry; a heat gun can speed up the process. 


While you wait you can make some jute flowers to decorate the bag later. I made 2 different flowers. I started by using a circle punch to cut out 3 circles from card stock and glued them together. Then using a hot melt gun I glued the end of a ball of jute string to the circles centre, then placed spots of glue to anchor the string as I wound the string around itself until circle was covered.  


The daisy flower also used the same circle base, this time I used 6 pieces of string to make loops, and then filled the loops in with smaller loops until all petals were filled. Any pieces of the card that could be seen between the petals were cut away.


 I used a cardboard button to put a Kaszazz flower brad onto and repeated the same for my first flower and glued waxed cotton to finish off the flower centre. The daisy centre was decorated with a knot that had fallen off my bamboo leaf bag and to tie the flowers together with the serviette I used yellow striped cotton from Mystical scrapbooks and waxed cotton from Kaszazz.

 
Now back to the bag. Using Mont marte modelling paste and my favourite mini diamond stencil (Balzer designs)  I used a spatula to place dimension to the bag. 


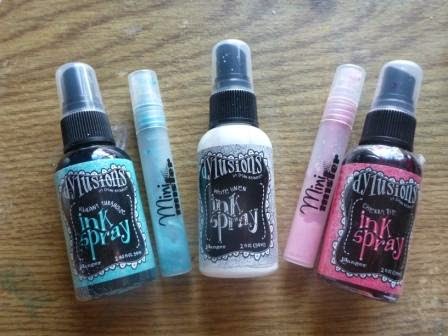
I mixed  into a Mini Mister (Kaszazz) Dylusions ink spray 'white linen' and 'cherry pie' to make a pink ink spray  and 'white linen' and 'vibrant turquoise' to make a mint ink spray. I sprayed these over the modelling paste when it was dry. 


On one of the white layers of the serviette I removed I stamped my Kaszazz 'dream, inspire, imagine' with StazOn ink and then used the distress inks 'squeezed lemonade', 'stormy sky' and 'peeled paint' to add colour. I then used the same technique with the Mod Podge to add it to the surface.


When it was all dry I hot melt glued the flowers I made on, a few extra pieces I found in my stash including wood leaves, butterfly and antique flower.  I then added some washi tape, blended some vintage photo distress ink over the mini diamonds to soften the white against the jute and then a few splats of black paint to finish it off.


   I had a great time experimenting with my scrapbooking techniques on a new medium.
I hope I've inspired you to try something different. Thanks for visiting my tutorial and  hope you take the opportunity to check out the talented design team on Off The Rails Scrapbooking blog.

Sunday, 6 April 2014

Stencils and Masks Inspiration layout.

Welcome to my April Off the Rails Scrapbooking Design Team Inspiration Layout -Stencils and Masks.

Scanning old photos and slides are fun, and bring memories back to life, this photo is of me and my dad with a doll that I think my Nan made me. I was about 18mths when this was taken.


On this layout I used my Kaszazz lace stencil with Monte marte impasto. Firstly I stamped the Kaszazz 'reason, season, lifetime' stamp using black StazOn onto my white card stock twice.  I placed the stencil over the lower stamping and smeared the impasto over to create a clear texture, purposely missing small sections to fill in with distressed ink later. Once dried I used a blending tool to blend Victorian Velvet Tim Holtz Distress Ink over the area. 


On the top of the layout I place a Tim Holtz idea-ology mini mask (Regal) swirl mask to one side of the top stamping  and sprayed with Dylusions vibrant turquoise then place a 2nd mask cross hatching style over the stamping  and sprayed it with Dylusions Lemon Zest. I blended  Squeezed Lemonade Distress Ink over the swirl mask to tie the masks together. 

The banner was made from a serviette;  I separated the top layer from the serviette, cut out triangles and using Mod Podge glued them onto plain white paper also coating the surface to give them a sheen. When dry they were individually taped onto pink and white striped cotton twine.
The background was finished by placing 3 stripes of butterfly washi tape and waxed twine from  Kaszazz, vibrant turquioise stain stamped onto the page and lucy stamps aging block 'Rust' with Weathered Wood Distress ink.


The material flowers I used I made  on a camping trip with Fiona, we lost hours cutting, sewing and beading flowers. The paper flowers are from Kaisercraft and I added a paper button and small blue flower to the top of the large blue flower to add height. After layering green and pink rose papers which I had distressed and inked the edges of, I added the photo of dad and myself and framed  it using pink striped cotton and waxed twine.


A big thanks to Dark Room Door    for sponsoring our Off the Rails Scrapbooking Challenge- Stencils and Masks. 

Thankyou for visiting my blog and I hope I have inspired you to try and experiment with stencils and masks as well. Hope to see you back again soon.


Sunday, 30 March 2014

White with Latte March 2014


.


  WW1

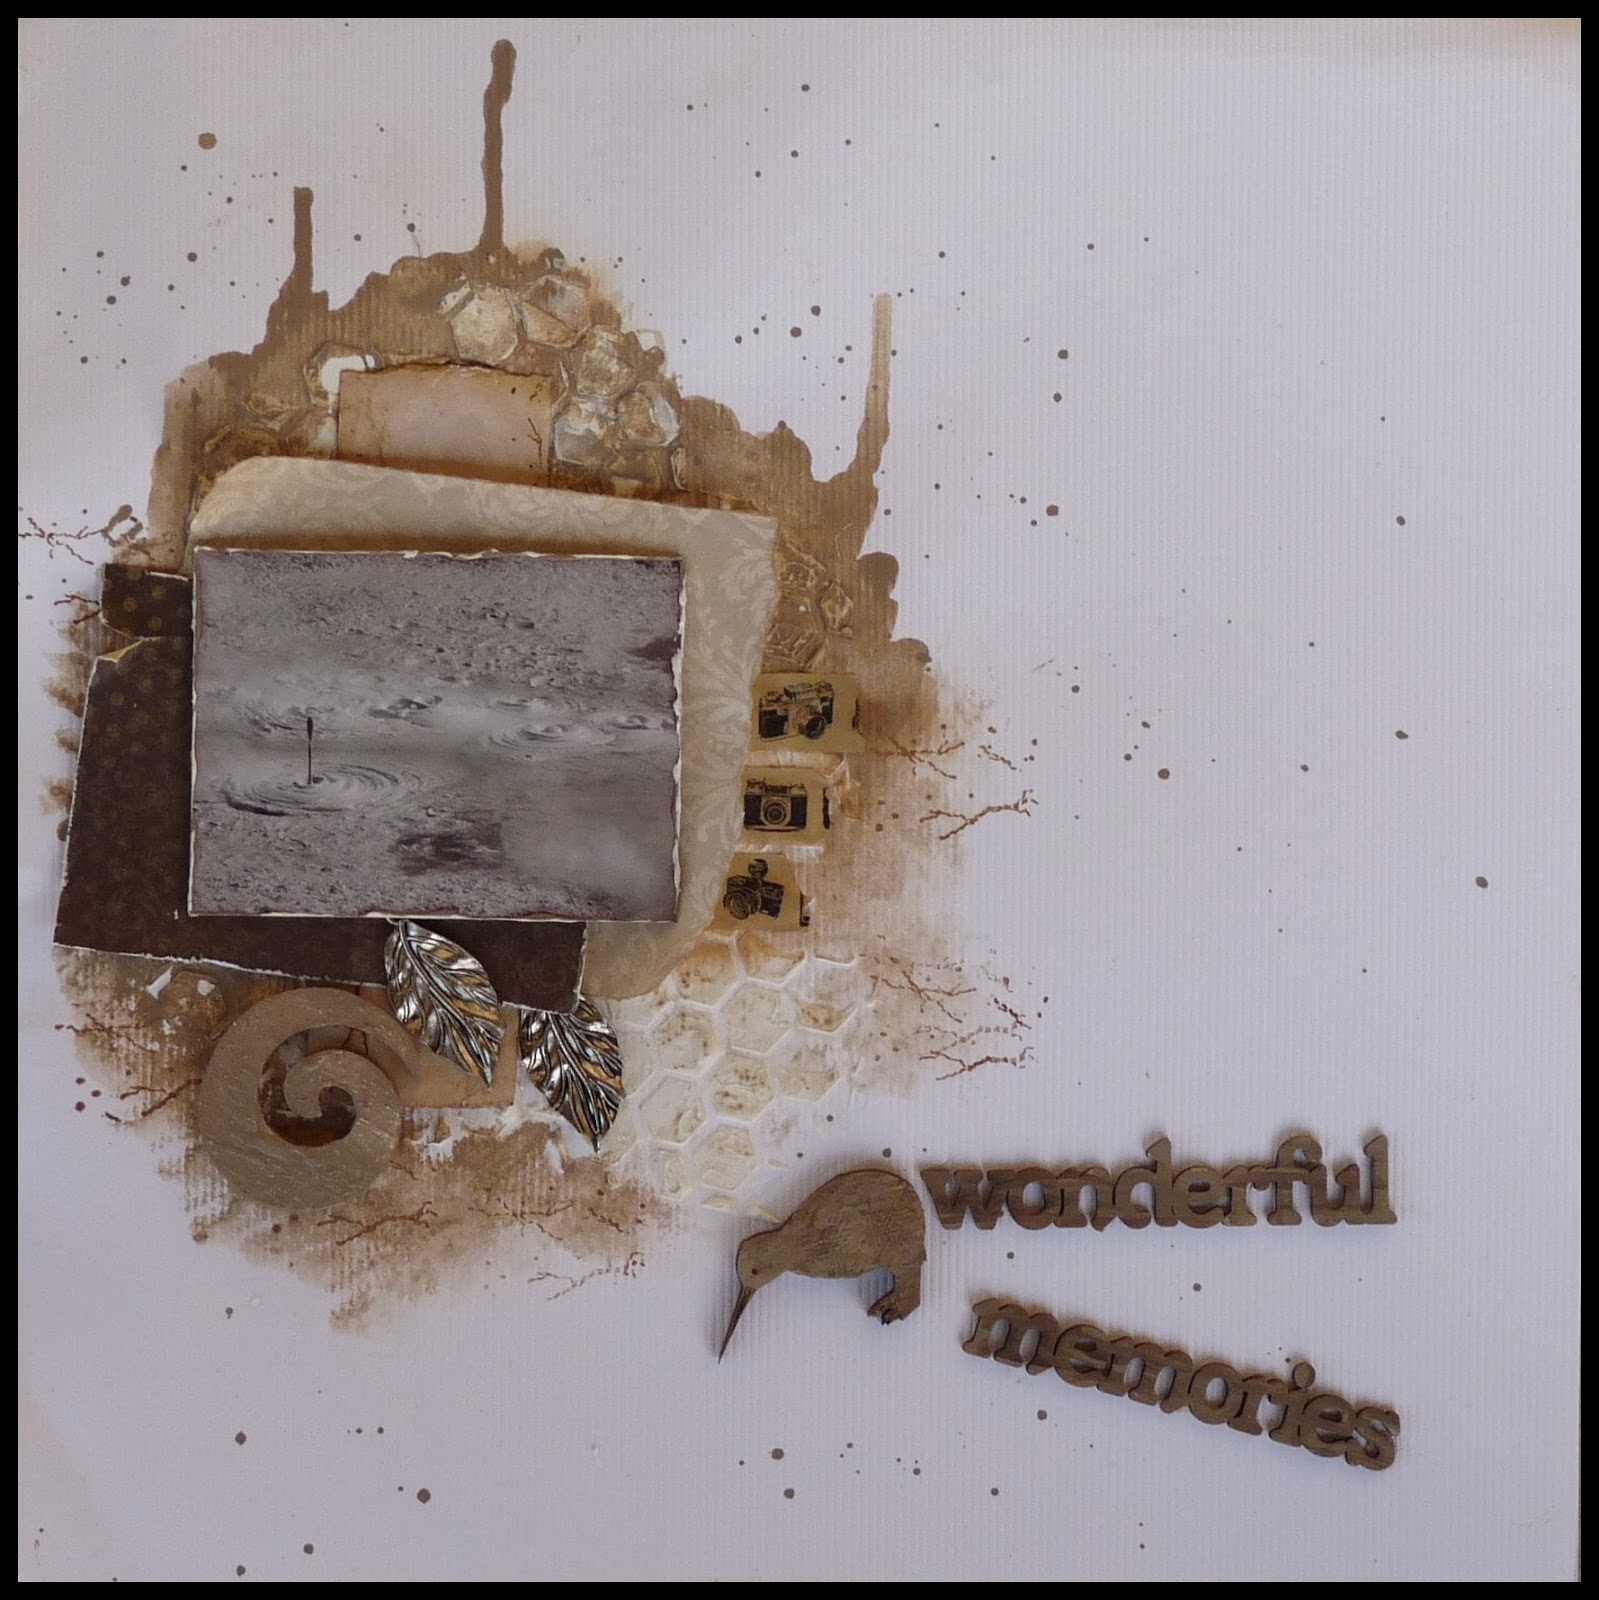
Last year I was lucky to have the opportunity to go to New Zealand to attend a conference for work. Before and after our lectures we were able to go sightseeing. One of the most amazing places we visited was the mud pools and Pohutu Geyser  at Te Whakarewarewa Thermal Valley, Rotorua. Watching the mud was mesmerising, I couldn't resist taking lots of photos determined to get some mud spurting upwards. This is only one of many.


I used Monte Marte Modelling paste and my new hexagon stencil to build texture onto my white textured card stock. Then I mixed Jo Sonja acrylic paints (smokey pearl and raw umber) to make the latte colour and watering it down I dribbled so that it resembled the way the mud moved upwards. I also used this paint mix to paint my words, wood kiwi and spiral I obtained from New Zealand. Cracks were stamped on by using my Lucys Stamps aging block stamp 'cracks' I brought from Kaszazz years ago. 

I selected a few pieces of earthy coloured paper from my scraps and used vintage photo distressed ink from Tim Holtz and a distressing tool to soften and edge the paper before layering it behind the photo. The washi tape of cameras (Kaszazz) I placed behind the papers were added to connect how I recorded this amazing sight that mother nature gave me and my work colleagues. To finish off the page I added some silver leaves to represent the silver ferns; the emblem of New Zealand and  I splatted my watered down paint over the page imitating what the mud did as we watched it.


Hold on I haven't checked it out yet.
Yep... Yep.... Okay you can entry it it passes.


Thanks for checking out my White with 1 challenge blog entry for March, I'll be posting again soon so come and check out more of my blogs and my critic Sebastian, our cat with much attitude.

Pastels, Dream and Frames. March 1,2,3 Challenge blog.

Imogen had been very excited about turning 3 since we mentioned it in December last year.
"It's my birthday today" she would tell us each day. We tried to explain that we had to have Christmas first, then it was 'mummys' birthday first and eventually on the 21st January we could actually say; "Yes Imi, it is your birthday today". 3 At Last we thought. We all went shopping prior to her party and Imi chose all the party supplies; smarties for the chocolate No:3 cake she wanted, purple and pink owl serviettes and purple ballons, plates etc. So it all seemed perfect for this challenge. 


My background constists of : pastel pink 12"x12" card stock, Serviette Imi chose for her party,  Plaid Modge podge to paste and give the serviette a smooth gloss finish, texture was added using a
lace and spot stencil and a crown mask and a selected colours of Ranger Tim Holtz distress stains and distress inks added colour.


I used the Kaszazz 'reason, season, lifetime' stamp and Black StazOn to start my background before adding the serviette
 with the Mod Podge, and used a Kaszazz lace stencil and Monte Marte Impasto to create a clear texture, purposely missing small sections to fill in with distressed ink later.


Combining some Ranger Dylusion vibrant turquoise and white linen I  sprayed over the crown mask and used Lemon Zest onto different areas over the page.
The lace stencil area was covered with squeeze lemonade distress ink , then I used  turquoise mix and white linen stain until I was happy with the effect.
Mixing a small amount of Tim Holtz distress stain dusty concord with Monte Marte Modelling paste I used the dot stencil to produce extra colour and texture. 

I coloured some cheesecloth by spraying it with white linen and dirty martini Dylusions ink then used cotton, flowers and a selection of scrap papers to layer behind the photo. The green frame was placed around one of the serviettes owls as Imi loves owls, a small frame was also placed behind that all important 3,  frame corners were added to the photo and to finish the layout I used the colours from the page to colour the word 'dream'. 

 Thanks for visiting my March 1,2,3 Challenge entry and hope you return to check out more of my blogs.


Sunday, 16 March 2014

1,2,3 challenge- purple, spirit, texture

1,2,3 Challenge~ Purple, Spirit, Texture.

My daughters' love is Highland Dance, it has been her life for 10yrs. Throughout these years her teacher and mentor has taught not only the skills of highland dance but the importance of being a part of an extended big dancing family, over the years she has taken all this and adopted it into everyday life and has grown into a wonderful mentor herself.  She is a brilliant role model for the young dancers of the future, taking on the challenge of teaching the  'wee ones' of our school as well as supporting all dancers and parents as much as she can. Becky holds the 'Spirit of Highland Dance' close to her heart and inspires others to be the best that they can be and  the importance to be there for others. 
With this in mind I thought that the photo I took at a ceilidh that the school performed at last year, depicted the 'Spirit' she always demonstrates so well.


The background TEXTURE was made with my new mini diamond stencil (Balzer designs) and Mont Marte white Gesso, after it dried I dabbed PURPLE Distress Stain (Ranger Dusty Concord from Kaszazz) onto the diamonds and sprayed it with water letting the ink spread out and dribble down the page. Stamping I added to the background included; diamonds (Stampin up set of 5),  and Texture stamp (Lucy's Stamps Aging Block).  On the top of the layout and under the photo and paper stack I used music Washi tape (Kaszazz) with PURPLE Artist Chalk (Kaszazz) for added colour and texture. To finish off the background I added water to some Dusty Concord Distress Stain and using a paint brush, splatted it onto the page.
Paw of Approval from Sebastian.


I chose a range of papers from my scraps and tore the edges to soften the look and used a stamp that I had purchased at a highland dance competition, a pair of pumps (highland dance shoes) to decorate one of the papers and to define the photos I edged them with black Gesso


My heading is 'Love The Highland SPIRIT' and is made in 2 parts. 'Love'  is made from my 'Love will find a way' stamp (Stamp-it) edged with Distress Ink (Ranger Vintage Photo and Dusty Concord) and black Gesso and decorated with a highland dancer I made by stamping another of the highland stamps I purchased at a dance competition onto Shrinky Dinks (Kaszazz) and heated in an oven for approx 1 min.   'The highland' is handwritten and the word SPIRIT was made using Kaisercraft chipboard lettering painted with PURPLE Distress Stain (Ranger Dusty Concord from Kaszazz) and then when dry I covered each letter in  Dimensional Magic (Plaid Royal Coat). 


Thanks for visiting my first 1,2,3 Challenge entry and hope you return to check out more of my blogs.

Sunday, 9 March 2014

'Bling it up' -Off the Rails DT reveal


'Bling it Up' - Off the Rails Scrapbooking

It's taken me a while but I have eventually got to scrap my beautiful eldest daughters Yr 12 graduation day. Even thou the day tried to dampen our spirits with light showers it also provided us with the opportunity to get some wonderful natural photos, the umbrella was a great prop that helped give the photos that something different.


I chose the royal blue card stock as it complimented the beautiful colour of Bels' dress, to add dimension I sprayed Ranger Dylusions ink 'white linen' in different areas over the whole page, I then using my new Balzer Designs 'mini diamonds' stencil and Mont Marte modelling paste to add depth to my layout. The embellishments on her dress were diamonds that were decorated with rhinestones; so the stencil and rhinestones I used seemed the perfect choice to add to the layout. I sprayed Ranger Dylusions ink 'London blue' over my stenciled diamonds after they dried to tie everything together and soften the effects. 


As it was raining and there were rain droplets on the umbrella I thought I would add a glimmer effect to the paper by adding Tattered Angels glimmer Mist 'glacier' over different areas of the paper above the photo, and then to resemble the rain I added smears of 'Ice Stickles' from Kaszazz and rhinestones cut from Kaisercraft Rhinestone Flourishes.


Other bling I used included Border scrolls and the double rhinestone circles from Kaisercraft and a high heel shoe similar to what Bel wore on  the day. 


I used  black 'crafter ink' and Jo Sonja's acylic artist paint to edge the papers and photo and to stamp patterns over the papers that I layered under the photo and the white embossed letters 'graduation MHS'. The letter stamps were purchased from my local Lincraft shop, stamped with 'Tim Holtz' distressed ink embossing pad and embossed with white embossing powder (Kaszazz) and set with a heat gun onto paper sprayed with 'London blue' dylusion ink spray. The circles were made by dipping the end of different size in the white watered down paint and a 'Lyra aquacolor' crayon (Kaszazz) was used to draw the black circles. 


To finish off I traced the letters with a black fine tip pen and used watered down Jo Sonja's white and Ultramarine deep blue artist colour paint to splash specks across the page.


What do you think Sebastion? I gather you liked it as you gave it your lick of approval as usual. Thanks so much for your input.


A big thank you to  Hobbies from the Heart for being our sponsors for the Off  the Rails Scrapbooking 'Bling it up' challenge 
Hobbies from the heart
 Thanks for visiting my 'Bling it up' contribution to the Off the Rails Scrapbooking Blog design team, I hope this has helped to inspire you and you have lots of fun and I'm looking forward to seeing how you have added bling to your next layout.