Saturday, 21 November 2015

White with 1- Grape November challenge.

I love scrapping my family and have had this photo of my daughter and grand daughter for a while, I've been to more scrapbooking workshops and my scrapping buddy and amazing friend and artist Fiona of Pastiche Scrapbooking Studio has inspired me to do this page using hand drawn patterns and bright watercolours. A big thankyou Fiona for inspiring myself and so many others.


 Items I used included:
  • Embossed 12"x 12" embossed paper from my stash.
  • Mont Marte Black, White Gesso and Impasto
  • Black acrylic paint
  • Small long nosed squeezy bottle
  • Palette of Watercolour 'brights' 
  • StazOn black
  • Stampendous stamp 'Cling Vintage Note"
  • Kaisercraft and miscellaneous flowers.
  • Little Birdie butterfly
  • Scrap Girl 'heart' flair
  • Prima White wire thread
  • Cheese cloth- white
  • Tim Holtz Dyslusions Ink Spray 'Crushed Grape'

Firstly I prepared my paper with a coat of white gesso and while that was drying I mixed some Impasto, black gesso and water together and when it was at a consistency that could be poured from a small long nosed squeezy bottle with a small hole cut at the end. I felt that the impasto had slightly dulled the the colour so I added a small amount of black acrylic paint, mixing the paint and mixture together with a little more water and a good shake of the bottle. 

I drew free hand with the squeezy bottle making stripes and heart shapes using the tip of a palette knife to roughen the edges of the paint. 

After it had dried I sprayed the paper with water and then added 'grape' watercolour in different quantities in different areas until I was happy with the effect. When it was dry I used the same colour to splat around the painted areas. 

The next step was stamping some script around the painted area and cutting up 4 pieces of cheese cloth. I frayed/distress the edges; leaving two smaller ones white and spraying the other 2 with 'crushed grape' Dylusions ink spray. 

To complete the page I backed my photo with grape and black cardstock, layered the cheesecloth, added flowers, the butterfly and flair to my page. I felt it needed something to frame my photo so I wound the white wire thread into a circular shape and added over the page.


 Thanks for popping over to see my latest page and hope you join me in taking on the challenges such as White With 1 in the scrapbooking world.

Wednesday, 18 November 2015

Show us your stuff- November Challenge

I have had a photo waiting patiently to find the right page and right time to be scrapped, The 'Show us your stuff' November 'Travel' Challenge was that perfect theme and time. This photo was a perfect memory in time for me, spending time with my mum and dad in Switzerland on a holiday before we went to Basel to watch my daughter dance in The Basel Tattoo with OzScot Australia. It was a fantastic month long holiday where we were able to spend precious time together making priceless memories that will stay with me for ever.

Show us your stuff November Challenge Board.

Items I used included:
  • Patterned 'compass' paper (12"x12") and 'chevron' paper and 'travel die cut' (Now Boarding) (6"x6") from Kaisercraft
  • Mont Marte Impasto
  • Mont Marte white gesso
  • Wet Ones.
  • Ranger Dylusions 'White Linen' and ' London Blue' mixed together.
  • Distress Ink Tim Holtz; 'Iced Spruce' and ' Stormy sky' 
  • StazOn black ink.
  • Stamps: Stampendous 'Cling Vintage Contract' and Kaszazz 'Art Background'
  • Rub on 'Moment in Time" Kaisercraft
  • Flowers from my stash including Kaisercraft and Little Blue
  • Homemade embellishments: Heart embellishment Funky flair 'clock' flair, Green 'Heavenly heart with butterfly'
  • 2 Crafty 'memories' chipboard word
  • Prima white 'Wire Thread'
  • Map from my trip to Switzerland 
  • Cheese cloth
http://www.clker.com/cliparts/w/i/a/Y/y/N/scroll-hi.png

 To prepare my paper so that the mixed media layers didn't absorb into the paper and prevent the spray and dripping of the paint from bleeding I sealed my paper with Impasto. After it dried I used a large brush and brushed on gesso lightly, building layers until I was happy with the finish. To soften any sharp edges I used wet ones to wipe over the surface.

Mixing 'London blue' and 'White Linen' inks together in a small spray bottle, I had made the colour I needed then sprayed lightly in some areas and heavier in others to obtain sections that would dribble and others that didn't giving the page more depth and interest. After it dried I added stamping 'Vintage Contract' with StazOn ink and then began layering my elements and photo. Firstly I placed my cheese cloth on which I'd stretched and distressed the edges of , then my photo and finally placing flowers, die cut and heart around the photo until I was happy with their placement.

To complete the page I inked my 'Memories' chippy with Distress ink 'Stormy Sky', rubbed on my Moment in time, placed magic mount on the back of my clock flair and placed it in the centre of the rub-on. The word 'TRAVEL' was made from the leftover letters of the alphabet I had stamped from the 'Art Background' stamp for a previous layout I had made. After cutting them out I edged them with 'Iced Spruce' distress ink.

 Something was missing so after coming back the next day I added some chevron paper which I'd torn and inked the edge with some more 'Stormy sky' and some white wire circular to frame the photo. 


http://www.clker.com/cliparts/w/i/a/Y/y/N/scroll-hi.png


http://www.clker.com/cliparts/w/i/a/Y/y/N/scroll-hi.png


Thanks for coming over and checking out my latest layout and hope this has inspired you to join in with the Show us your stuff and some of the other amazing challenges that are happening in the Scrapbooking world.

Sunday, 15 November 2015

November Inspiration- Off The Rails Scrapbooking

When I was a child growing up in the Mid North of Sth Australia, my parents took my brother, sister and myself out to the great beyond most weekends. One of our favourite places was the local forest where we always visited the 'Cork Tree', we were fascinated that cork actually grew on trees. This layout was inspired by those wonderful family memories and the beauty in nature.


Items I used included:
  • Gesso- Ranger from Kaszazz
  • Kraft paper- Kraft bouquet
  • Crackle paint- DecoArt white
  • Imaginarium- Kate Doily
  • Garden Grunge collection stamp -DinaWakley
  •  Stamperdous Frans- Vintage Contract
  • Lindy Stamp Gang- Magicals- Autumn leaves (cat tail cooper brown.
  • Lindy Stamp Gang- Starburst Colour spots (Seamint green, Glory of the seas gold)
  • Kaszazz 'Art' Stamp
  • Twine
  • Cheese cloth white- stained with Dylusions Ink- chopped pesto
  • Dylusions Ink - Lemon zest, London Blue, Cut grass
  • StazOn Ink
  • Natural elements- leaves and gum nuts. 
  • Water bottle to spray paper, paint and ink.
  • Watercolour paints

Firstly I covered the patterned Kraft paper with white gesso then remove sections with a 'wet one' nappy wipe. When dry I sprayed the paper with water and using a feather brush dipped into the starburst colours, gold first then the green. Even if I hadn't been in the bush with no electricity for heat guns I still would of allowed this layer to dry naturally as I did as it allows the paint to dry were I wanted it and not be moved by the hot air. I then repeated this process with the 'magicals' copper brown.

I painted the Imaginarium positive and negative pieces with white crackle paint and let it dry to crack. Then I pulled at my cheese cloth until it looked distressed and sprayed it with 'Chopped Pesto. 'As it was drying I stamped my grung flower stamp and script onto my dried page, cut out my words and edged them with StazOn and then went for a walk to collect some natural elements. to add to my design. 

I layered and moved my pieces until I was happy with their placement and to pull all my elements together I used twine in circles.


Thanks for visiting and I hope I inspired you to join in the fun of scrapbooking your memories as I do. Jump over to Off the Rails Scrapbooking and check out the other amazing layouts and projects by the incredible artists on the design team.

Saturday, 7 November 2015

October tutorial- Off The Rails Scrapbooking.

I have always enjoyed re-using or re-purposing items from my recycling box, I re-use wrapping paper where I can, ribbon, boxes, paper bags etc. Boxes are perfect instead of wrapping paper, giving your present a personal touch and making it very special for the person who receives it.
With my mums birthday coming up soon I thought it was a perfect time to decorate a box for her to place her present in. So while I was on my camping and geocaching holiday with my hubbie I thought I would take my scrapbooking supplies along and create this for my mum.


Items used:
Recycled items including:
-Cardboard box that I received my computer battery in.
- Photo of mood board printed for colour reference and picture inspiration 
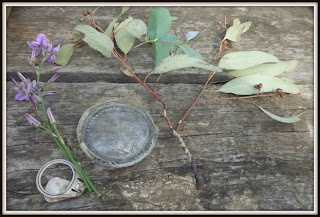
- Bottle base found at my campground on the ground
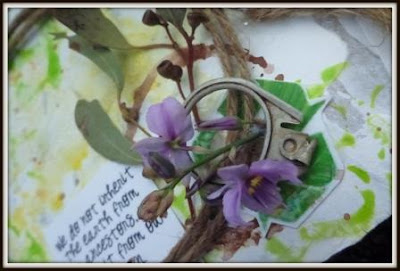
-Ring pull from a can: found at my campground on the ground 
-Empty pill blister pack
-Twine from presents and miscellaneous places.
Natural elements from my camping holiday:
- feather from 'Kryal Castle' in Ballarat
-gum leaves and nuts
-flowers
Scrapbooking supplies:
-Ranger Gesso from Kaszazz
-Ranger Gel medium (matt) from Kaszazz
-Set of watercolours
-Deco Art media Crackle Paste White.


 1. Remove labels from box and cut out verse and recycle symbol. 'Green' one of our child care crocheted cats watched over the process of this project to be able to go back and share the techniques with the children ( the child care cats travel on holidays with our families and staff, writing about their adventures in their books.).


2. Place gesso on with spatula then let dry. Then add crackle paste to area you want to crackle.

 3. Using the flat side of the blister pack add gree water paint that has been mixed with Matt gel medium and then place the painted pack surface onto the gesso area of the box in a stamping style. Repeat with a yellow watercolour mix. 

4. Splat surface of box with orange, brown, green and yellow waterpaint.


 5. Thanks to my friend Fiona's inspirational idea, I have twine tied around my molding paste container ready for use. I have 1 string, 2 string variations.


 6. I looked around the campsite and found a variety of leaves, nuts, rubbish and flowers to use to decorate the box. 

7.I placed brown watercolour paint to the base of the broken bottle and when I placed it onto the box moved it slowly twisting it in a circular motion to obtain a circle and not just a dotted circular line.


8. Adding the verse and recycle symbol and the natural/recycled elements to my box finished off my project.


Thanks for popping over to checkout my latest tutorial. For more inspirational pieces of art drop over to Off The Rails Scrapbooking to view other amazing artists.