What an amazing Mood board for the Off The Rails Scrapbooking July Challenge, there are so many parts of this board that you can draw inspiration from. I was drawn to the mystical view of our 'galaxy in a teapot' and thought it would look great on a small canvas. So here is my take on the board and how I produced it.
 |
| Thanks to Imaginarium for Sponsoring this months Challenge. |
 |
| Off The Rails Scrapbooking Challenge July Mood Board |

Products I used included:
- Canvas 8" x 8'
- 6" x 6" Crafters Workshop Stencil 'Mini Antiquities'
- Monte Meo Modeling Paste
- Gelatos: red, blue, yellow and green
- Scrap paper and cardboard from my stash
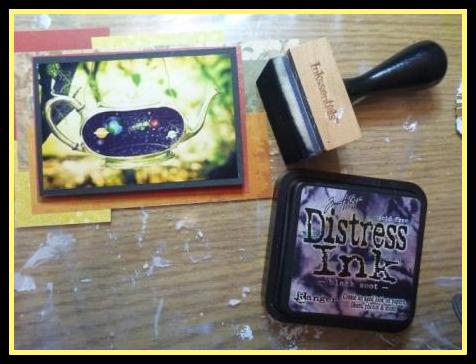
- Tim Holtz Distress Ink 'Black Soot'
- Selection of Flowers from Little Birdie, Prima and my stash.
- Ranger Multi Medium Matte from Kaszazz
- Glitter and fine silver opaque beads.
- Imaginarium Designs' Dragonfly' chipboard
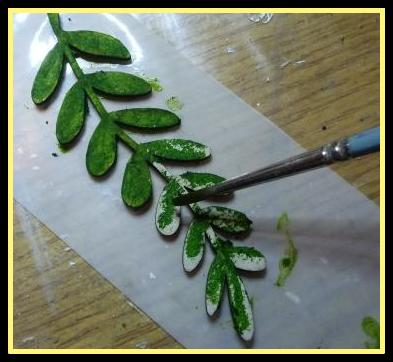
- Leaf stem chipboard
- Versa Color Ink 'Bisque' and Tinby Metallic Melts 'Silver'
- Embellishments from my stash: key, flower and heart
- 'Moon Beams' Flair from Um Wow Studios
- Tattered Angel Glimmer mist 'Glacier'
- White cotton twine with gold thread
- Old Dymo manual label maker and black tape.

Step 1: I placed my stencil onto the canvas and spread modelling paste over it, carefully moving the stencil off and replacing it to add more pattern to other areas of the canvas.
Step 2: Using the red Gelato I rubbed the colour relatively heavily around and over the edges and then used water on my finger or paint brush and blended the Gelato towards the centre of the canvas. I also used small amounts of blue over the top at the edge and blended it into the the red to darken the colour to produce a more purple colour to the edges.

Step 3: Using a dry piece of paper towel I regularly rubbed over the stenciling gently to reveal the pattern again as it had been lost a bit with the Gelato.

Step 4: I printed out a copy of the ' galaxy in a teapot' picture on photo paper and selected a range of papers from my stash to match the colours on the mood palette and in the photo. Using 'black soot' Distress ink and applicator I edged each piece of made a stack of paper adding pieces of cardboard under the photo to add height and depth.
Step 5: I added green Gelato to the leaf stems and then blended it with water. Also used the yellow and red to add colour to the small flower buds that reminded me of a miniature versions of the tulips on the mood board.


Step 6: Versa Color Ink is great to use on chipboard, I covered my dragonfly with it and because it stays wet for a while is also perfect to use with Tinby Metallic melts. I sprinkled the melts over the ink and used my heat gun to melt them to produce a beautiful embellishment.

Step 7: I made circles from my cotton twine and glued my stack of paper and photo into place and then experimented with arranging my assorted flowers, flair and some embellishments until I was happy before gluing them into place as well. I covered my photo and paper stack with scrap paper before spraying the surface with the Glimmer Mist and sprinkling it with glitter before it dried.

Step 8: After adding my dragonfly I then placed Multi Medium and the silver opaque beads into a palette and mixed them together, then using a palette knife added the mix to the flower edges of the canvas. To add a little more sparkle I sprinkled some extra glitter onto the mix.

Step 9: I love my old style manual Dymo label maker so I made the 'A Beautiful World' title using black self adhesive tape.
Here are some close-ups for you to checkout:


Hope you enjoyed seeing how I made my 'Galaxy in a Teapot' - A Beautiful World. Pop over to Off The Rails Scrapbooking July Challenge and see the other amazing inspirational creations this month and to Imaginarium Designs to see how to view and purchase some of their gorgeous chipboard creations.
Hey Sandi,
ReplyDeleteAmazing work and a great tutorial. Keep it up!
^LM
DymoSupport