 |
| Off The Rails Scrapbooking May Challenge. |
I used the following supplies to create my layout
- 12"x12" White Bazzil Card stock
- Memory Maze chipboard 'Fancy Boarder' & the Arrow from the 'Sunshine word set' & words Friends and Together from the 'Together word sheet'
- The word 'Dance' from Kaisercraft 'Pop Collection' page.
- Black card stock for backing the photo and word 'Dance'
- Kaisercraft 6 1/2"x 6 1/2" paper pad 'Enchanted Garden'
- Bella 'Die cut' Pack
- 'Blue London' Dylusions Ink Spray
- Black gesso and water in an empty glue bottle with fine tip
- Dimensional Magic.
- Wire thread- white and black
- Acrylic paint 'Semco'- black, Phthalo Blue and Ultramarine.
- StazOn Ink- Black
- Black ink
- I first chose the chipboard pieces, the photo and die cuts I thought fitted with the theme I wanted to use; really hard when you have so many fantastic Memory Maze Chipboard pieces.
- I experimented with placement of pieces and thought of different techniques and colours I could use.
- Using the Black StazOn Ink I edged all of my die cut and 'Dance' pieces.
- I glued my photo onto my chosen backings and edged the final piece with StazOn Black
- Using black acrylic paint I painted the large chipboard piece and the word 'Together'. I then mixed the blue paints together until I was happy with the colour I needed to paint the word 'Friends'. The arrow was painted half with black and the other with the blue paint.
- When the paint was dry I used the Dimensional Magic over the top of the words and arrow to produce a gloss 3D effect.
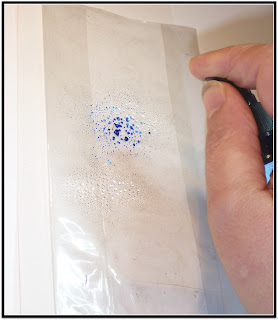
- I placed a piece of cardboard (The cardboard in the packaging of the large chipboard piece) on to my paper to protect my white space and leave approx 1/3 of my page to apply ink to. Using a small spray bottle filled with water I sprayed the exposed section of paper and then sprayed some water onto a piece of the plastic wrapping from the packaging of the chipboard.

- Next I sprayed 'Blue London' Dylusions Ink onto the plastic over the previously sprayed water .
- When I thought I had enough on the plastic I flipped it over and placed it onto the paper, I continued to do this until I was happy with the coverage and effect. (Glad I had that piece of card down as I dropped a big blob of ink onto it, oops too much ink and water that time)
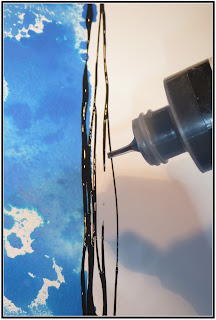
- When the ink was dry, I used some of my Black Gesso mix I had mixed for a recently layout I'd completed. The mix consists of Black gesso and water mixed into a small empty glue bottle with a fine tip. I slowly moved the tip above the blue edge as I squeezed the bottle gently to get the mix to smoothly move out along the paint edge.
- When the gesso dried I began to complete the layout by placing on the elements I had already prepared; chipboard, die cuts and words.
- Finally I added a few splats of 'Black' ink and 'Blue London' ink to finish off the background and 2 circles of wire thread over the photo to complete the layout.
Here are some close-ups for you all to checkout:
Thanks for dropping by, I hope my tutorial has inspired your creativity and that you come by our Off The Rails Scrapbooking Blog and give our challenges a try. I look forward to seeing your artwork.


BRILLIANT!!! Love this to bits Sandi xx
ReplyDeleteSuch a striking layout Sandi, it gorgeous
ReplyDelete