Showing posts with label Colour Blast Destination Anywhere collection. Show all posts

Wednesday, 22 September 2021

Take a trip journey to travel- Bee Arty DT inspiration

 I love revisiting my favourite trips and memories, that why I enjoy photography and making art journals.

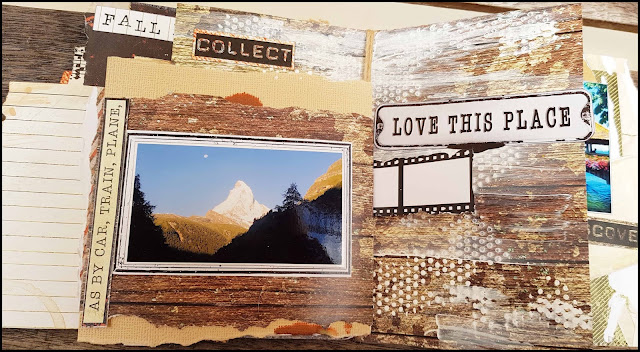
Using 'Destination Anywhere' designed by Queenie T I created my own handmade journal to keep some of my memories of my Swiss holiday and I'd like to share with you how I made it.

Products used from the Destination Anywhere kit: 

12"x12" pages .

Phrases and words from phrase page

Die Cuts: Transport

Stencils: Drippy-A6, .

Wooden, paper and material embellishments.

ColourBlast/BeeArty products: 

White heavy gesso

Colour Artist ink- Rust

Stencils: Pavement

Step1,2 & 3a

  • I selected a range of pages and ripped or cut them into different sizes and a edges. 

  • Folding them provided me with a booklet style journal. 

  • I cut out a plane using the Diecut template 'Transport', some words, tags and phrases.


Step 4 & 5:

  • To add texture I applied white gesso over different section of the pages with the 3 different stencils.


Step 6 & 7:

  • To add another effect I used the front of the stencil before the gesso dried and placed it onto a page and used a wet one to rub it over the stencil which left a shadow effect.  On another page I placed gesso over the spotted section and then smeared gesso over it with my soft sponge brush.


Step 8:

  • I also smeared some onto a plain page and when dry dropped small amounts of artist ink 'rust' and wiped it with the same soft sponge brush. 

  • A few other ink colours were dropped from a height to produce large splats.

Step 9:

  • After completing the base additions to the pages I built up the layers with the smaller sections of papers, phrases, natural material elements and photos. The journal was completed by staking the pages together and tying a piece of natural string around the folded sections twice and tying off.


Some closeups:


Thanks for joining me and I hope I inspired you to check out this amazing kit and the products at beearty.com.au . You can find more inspiration and links on BeeArty's facebook page https://www.facebook.com/BeeArtyHive


Thursday, 8 July 2021

Travel and Explore- Bee Arty DT

 Hi everyone hope you are all doing well and getting time to create your own beautiful art. I'd like to share one of my latest pieces, I love to spend time at the beach and with the cold weather arriving here in South Aussie it's time to remember the beautiful memories of traveling on the sea feeling free and being warm!!! 

For this page I used papers from one of the latest kits 'Destination Anywhere' by Queenie Yeung.

I used from the 'Destination Anywhere' Kit.: 12x12 page 'Starts here'

Tags phrases/words from 'Parcel' and the back of the cover page.

World and postcard from 'Arrival'

Stencils - 'Pavement' and 'Boxed in' from the 'Untangled' range.

Heavy White Gesso

Colour Blast Mica Powder 'Olive Grove' 

Colour Blast Colour Paste 'Envy', 'Stormy Weather', 'Just blue' and 'Snow White'
 
Thin craft cork A4 mat 

Page of music.
 
String.
 
Archival Ink- Black


Step 1-I used some gel medium to glue down some music paper to the cork.
 

 Step 2- Using the pages  'Parcel', the back of the cover page and 'Arrival' I cut out tags phrases, words,  and postcard, edging them all with black Achival Ink. 


Step 3- I used a spatula to smear 3 colours of Colour Paste over the 'Boxed in' stencil; 'Envy', 'Just Blue' and 'Snow White' onto the music and cork. I let this layer dry thoughly, placing it infront of my gas heater quickened to process.
.

Step 4- Using the 'Stormy Weather' Colour Paste over the 'Placement' stencil in the same way added another dimension and colour to the page. It's important to let the paste dry thoughly before doing the next layers.


Step 5- I experimented with placement of words, tags and photo. A hole was punched into the tag hole section and a small piece of string was connected. 

Step 6- The cork page was glued onto the 12"x12" 'Starts here' page. Using the mica powder 'Olive Grove' and a brush loaded with water, I made a concentrated paint to add around different sections of the page. I also decided to find a few more elements to add to the pages to  help connect the two pages together.


Here are some closeups for you to show you the details:


Thanks for joining me and I hope I inspired you to check out this amazing kit and others at beearty.com.au . You can find more inspiration and links on BeeArty's facebook page https://www.facebook.com/BeeArtyHive