Monday, 26 September 2016

Week 4 'The Block Super Challenge' at Scrapbooking Top 50 Australia.

Welcome to Week 4 of 'The Block' Super Challenge at Scrapbooking Top 50 Australia.

I was inspired by the triangles and the calendar's interlocking squares. Hope you like my take on the Week 4 Kitchen.


Items used include:

  •  White 12"x12" card stock
    Selection of paper- large piece to cover 1/3 of the page and scrap pieces to tear up into triangles and layer behind photo
    Old book page
    Kaisercraft Stamp 'Perfume' 
    Cardboard
    Black card stock
    Imaginarium Design Chipboard: 'Moment' and 'Capture', 'Nat's heart shapes', 'Chevron arrows', 'Cogs'
    mixed alphas for the word 'the'
    Cork arrows
    Acrylic paints: red, blue, black
    Metallic Melts; Copper, Bronze
    Versa color inks: black
    Glossy Accent glue
    White gesso
    Black wire thread.


    1. I glued down the piece of paper to cover the first 1/3 of the page and glued a piece of old book page 1/2 way down the join.
    2. Then I tore triangles from the burnt orange paper and glued them onto the edge of the paper join.
    3. Using a spatula to spread gesso over the triangles to soften the edges.
    4. I coated the chipboard words, letter 'h' and the outer section of the chevron with black acrylic paint
    5. The solid chevron arrow sections and the letter 't' I painted blue and the hearts red. 
    6. I used watered down paints to place splats over the page.
    7. When the chippie was dry I covered each piece with Glossy accents and left to dry overnight.
    8. The 'Cogs' were painted black and then I melted layers of Copper and Bronze Metallic melts over the cogs with a heatgun. 
    9. I stamped an image from the 'perfume' stamp onto a piece of the paper I plan to use behind the photo.
    10. I made a stack of assorted papers and cardboard and glued the photo on top, using the black wire thread to frame the photo.
    11.  Placed the cogs and chevron arrows into place, the cork arrows, alphas and words to finish off the page.


Thanks for dropping by to see my latest inspirational piece for the Scrapbooking Top 50 Australia.

Tuesday, 20 September 2016

September Inspirations from Imaginarium Designs.

Hi Everyone, Sandi here and it's that time again to share with you my love of using Imaginarium Design Chipboard to make my creations special.


My first creation is a layout I created in which I used some of the "Ephemera" I found in some antique shops with my scrapbooking buddy Fiona on the way to Melbourne.


I used modeling paste on the background and gave it a old antique feel by using Lindy's Stamp Gang Magicals 'Steampunk Sepia' sprinkled over it and spraying/brushing with water until happy with the effect. I also used 'Steel Shimmer' for the splats and drips over the background as well. 
I arranged the different ephemera into layers beneath and to the side of the photos. The photos were some that were found along with the negatives in the Kodak photo sleeve that I used. I added some of my Nana's lace and buttons as well and cardboard from the box that the ephemera was brought home in. 
The Imaginarium Designs chipboard I used included:
  •  Lower case letters IDAL0001:Covered with a thin covering of gesso and then used Versa color 'Pinecone' for colour.
  •  Edith Frame IDT0038: Used Versa color 'Olive' and covered sections with Metallic melts 'Copper' embossing powder and melted them using a heat gun.
  •  Inspire, create, IDW0092: Using the words 'create' and 'art' I first covered them with a thin covering of gesso and then when dry used Versa color 'Olive' to give them colour.
  •  Madison Flourish IDFL0019: Covered with a thin covering of gesso then Versa color 'Pinecone' and whilst wet sprinkled with Metallic Melts 'Copper' in sections and melted with a heatgun.  


Lower Case IDAL0001


Edith Frame IDT0038

Inspire Create IDW0092

Madison Flourish IDFL0019

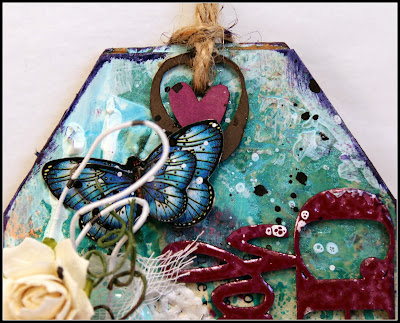
My next creation is a tag "Chase your dream", I'm new to making tags and will be making one each month to share with some of my scrapping friends.


The tag was made from cutting a piece of cardboard from a cardboard box with some of the top layer torn off at one of the corners. 
Added to the cardboard was a piece of Kaisercraft paper which was then sprayed with Lindy's Stamp Gang Starburst 'Magnolia magenta gold' and 'Tibetan poppy teal' 
The edge and a corner were stenciled using the TCW stencil 'mini Brazen star' with matt gel medium (x2) and white gesso (x2). Layers were created using a paper doily, white wire thread , old book page, Kaisercraft flowers sprayed with the Lindy's Stamp Gang ink colours, small flowers including resin and bronze ones, buttons, Prima brads, enamel dots and a silver bird. At the top I added a beautiful blue butterfly by Kelly-Ann -'Mothers Art'. After placing the chipboard and layers on I used white and black ink to apply splats and wiped the edges with Versa Color ink 'Neptune'.

Imaginarium Designs Chipboard used included (all coated with spray white gesso):
  • Chase your dreams IDP0197: Versa color ink 'Amethyst' embossed with Metallic melts 'Red velvet'
  • Bicycle small IDT0018: Versa color ink 'Neptune'  embossed with Metallic melts 'Glistening snow'
  • Lolabelles heart IDDL0015: Versa color ink colour; centre heart section 'Amethyst'  embossed with Metallic melts 'Red velvet', outer section 'Pinecone'


Bicycle small IDT0018

Chase your dreams IDP0197

Lou's heart shapes IDDL0015


My last creation  I'd like to share is "Love Us" a hessian frame I made for my daughter:


I smeared gesso over sections of the canvas first and then sprayed Lindy's Stamp Gang Starburst  'Tibetan poppy teal' and splats of 'Magnolia magenta gold and black ink. I then stamped with the Dina Wakely stamp 'Reversed grunge growth ' onto white card and embossed it with black embossing powder before cutting it out and spraying it with water and let some 'magnolia magenta gold' spread over sections of the stamping. The black wire thread was cut into lengths and tied together before gluing it in place over the cross hatched chippie. Also finished the canvas off with a Funky Flair 'Us'
Imaginarium Designs chipboard used included (all sealed with white gesso):
  • Loolabelle's cross hatch circle IDD0025:  Versa Color ink 'Neptune'
  • Lou's heart shapes IDDL0015: Versa Color ink 'Amethyst' and embossed with Metallic melts 'Red Velvet'
  • Nat's hearts 1 IDD0041: Versa Color ink 'Amethyst' and embossed with Metallic melts 'Red Velvet'
  • Oval frame with brackets IDFR0009: Versa Color ink 'Bisque' and embossed with Metallic melts 'Gold Nugget'


Lou's heart shapes IDDL0015

Loolabelle's Circular Cross hatch IDD0025

Nat's heart shapes no 1.  IDD0042

 Thanks for dropping by and checking my latest inspiration over at Imaginarium Designs, looking forward to seeing you again soon. 


Sunday, 18 September 2016

Week 2 "The Block Super Challenge"- Scrapbooking Top 50 Australia.

Welcome to Week 2 of 'The Block' Super Challenge at Scrapbooking Top 50 Australia.

I was inspired by patterns and colours on the bathroom tiles pictured on the mood board and thought that the photos from my European Holiday 2yrs ago of buildings was perfect to reflects where buildings of old meet with the modern era. Hope you like my take on the Week 2 Bathroom.


The wet medium used was matte gel medium and acrylic paint and I chose to draw zentangles.

Items used includes:

  •  White water colour paper 12"x 12"

  • Stencil girl 'building'stencil

  • Matte Gel medium 

  • Hand drawn zentangle tiles/squares on white card

  • 'Totally' Imaginarium Design chipboard

  • Yellow, green, white and orange acrylic

  • Clear thick plastic.

  • Kaisercraft 'graffiti' stamp

  • StazOn

  • Fine black Sharpie.

  • Black cotton.


  1. Placing the stencil over the white paper I smeared the gel medium over sections of the stencil and sat the page aside to dry. 

  2. I mixed some of the acrylic paints together until I was able to make two colours that I could see in the buildings in the photo.

  3. I placed the watered down paint onto some plastic sheet, I used the plastic that cling stamps or my chipboard comes in. I flipped the plastic over onto the page where I wanted the coloured sections pressing firmly around on the plastic to spread the paint.

  4. I splattered some of the left over paint around on the page.

  5. While the paint dried I drew my zentangle tiles which was more therapeutic than I thought it would be I must admit.

  6. When the paint was dry I drew around the buildings and windows with a fine black Sharpie.

  7. Using the StazOn ink I stamped the graffiti stamp onto the page.

  8. I covered the 'totally' chippie with black ink and used some ink to splat onto the background.

  9. I cut some matching scrap paper and a white piece which I'd written 'simply gorgeous' on, edged them both and layered it under my black matted photo.

  10. Placing cotton down first then the layers which I'd placed a piece of cardboard under to lift the pile up I then positioned my zentangles where I wanted them.


Thanks for dropping by and checking out my inspiration for week 2 of our challenge


Tuesday, 6 September 2016

Imaginarium Designs Chipboard Sept Theme- Kraft + melon Challenge.

Over at Kraft+ they have a fantastic Kraft+ melon colour challenge. I couldn't wait to use my melon coloured Lindy's Stamp Gang on my Imaginarium Design Chipboard to show case what a simple use of colour on this fantastic chippie can add to your scrapbooking memories. 
This layout is of my beautiful daughter, how the years have passed, she has grown to become a beautiful woman and mother. So proud of you honey.


The items I used included:
  • 12"x12" Kraft Paper stock
  • Matte gel medium- Ranger
  • Lindy's Stamp Gang Flat Pabio; Merci Beaucoup Mint, Frenchy's Pink Pouf and Mango Mania
  • Modeling Paste 
  • Kaisercraft 'Sktechy' cling stamp
  • Stencil - Stencil Girl 'circles, circles'
  • Black wire thread
  • Cardboard and hessian
  • Kaisercraft 6 1/2" x 6 1/2" paper 'Enchanted Garden'
  • Imaginarium Design Chipboard- Skeletal feather, Picture of you and Nat's heart in a frame.

 After sealing the kraft paper with a light coating of gel medium I placed my stencil over the dry paper and sprayed it with the 3 Lindys Stamp Gang sprays in 3 different areas.  While it was drying I made up 3 small batches of coloured modeling paste using a small amount of each of the sprays in each batch of paste. Realigning the stencil over the paper I smeared each coloured modeling paste over a couple of sections in it's corresponding section. I then left it to dry.

Keeping with the natural  Kraft+ theme my photo stack comprised of cardboard, hessian and a kraft pocket which I'd used the Kaisercraft 'sketchy' stamp with Black StazOn and mint ink to stamp onto it with. The Imaginarium Design chipboard was coloured using the mint spray sprayed onto the unsealed feather and small frame, the 'picture of you' was coated with black gesso. The hearts were roughly covered with the pink modeling paste to tie it together with the background and I also added a small smear of the paste over the small mint frame when the spray was dry to give it a mottled effect. 

To finish my layout I backed my larger photo with Kaisercraft Enchanted garden paper and framed it with some black wire thread from Prima, I then slipped the school photos into the pocket and attached the frame over the last photo and glued on my title and hearts


The chipboard I used included:

IDDL0006 Skeletal feather


IDP0081 Picture of You


IDD0042 Nat's Hearts 1 (I used the ones in a frame)

 Thanks for coming by and checking out my layout inspiration for the fantastic challenge over at Kraft+ . Why don't you give it a go, it's fun and there's some fantastic prizes to win including some Imaginarium Design Chipboard.