Friday, 11 March 2016

My "Cute Little Man"- Scrappy Designs 'Stars Fly' February Kit.

Hi, I'm really  excited to share with you that I am now a Design Team Member over at 'Scrappy Chat Designs'.

 As an 'Arty Chic'  I'm looking forward to sharing with you my ideas and techniques with the amazing products in this months  'Flying Stars" kit.

Today I will be sharing with you how I produced my background with my new favourite 'Colour Crush' powders by Tinby Designs.


Here's my layout-  'Cute Little Man'


Step 1: Place a small amount of Colour Crush into a palette, I used the end of my spatula to ensure I could control the amount and didn't spill any.


Step 2: Using the plastic pipette add a small amount of water to the powder, depending on the colour intensity you want depends on the ratio between the powder and the water.


Step 3:  Using some scrunched up paper towel, blot some of the ink onto two sections onto your page and then using a clean wet-one, blot over the sections to soften the areas and edges.


Step 4:  Continue to add ink until you are happy with the shape; remember to leave lots of white space. If you are unsure it’s a great idea to practice on a spare piece of white card until you feel more confident.


Step 5: Let your ink dry and add some more with the paper towel if you feel you need some more depth to your areas. I added a little more after the photo was taken to make the shapes a little less square.


I hope you enjoyed learning about  this technique  and it inspired you to grab this amazing kit and try out some of tips, techniques and products. 

See you soon with another creation from this kit.


Are you a Scrappy Chat Designs member yet?  Our members receive videos, tips and tech sheets similar to this little technique every month.

If you want more of this then ...........


Here is how you can join!

Joining Scrappy Chat Designs is like doing 3 classes each month - all in the comfort of your own home!

Each premier kit comes with:
Video AND instructions to complete the three layouts and feature many techniques with product to be used well after the life of the kit. (With all of our kits you will have plenty of product and knowledge to add to future projects)
Photos of each project including close up detail pictures.
All the product needed to complete the project with a list of additional basic items used such as ink/ paints/gesso/texture paste and colour sprays you will need out of your supplies.
The kits focus on how to use various products teamed up with some pretty paper to compliment them, so there is always less or non-consumable products in our kits, to not only help you complete some beautiful projects, learn many techniques and ways of using the different product as well as taking them well beyond the kit projects.

Kits are $45 + postage and come out monthly. Please e-mail us at orders.scrappychatdesigns@gmail.com if you would like to order this kit

For more kits and other products visit our website www.scrappychatdesigns.com.au
Scrappy Chat Designs Kit club Membership (e-mail us to purchase):

This lasts for 3 months is $149 and includes 3 kits at OVER 10% off!!! and postage for all 3 kits  INCLUDED (they are released monthly).  As a member you also get ‘insider’ info on what is coming up in the next kit – sometimes even a pic! You get additional 'Technique sheets' showing you more techniques you can nail with the product in the kit from the talented Arty Chic's.  You are also guaranteed the kits which do sometimes sell out VERY quickly.  If you are interested in membership, you need to pay the membership fee by the 30th of the month prior.  So to commence in February (next kit to be released) you need to have your membership fee paid by 30th January. Just email for this deal orders.scrappychatdesigns@gmail.com 

Just email for this deal orders.scrappychatdesigns@gmail.com

Tuesday, 1 March 2016

'Sweet'- Scrapbooking Top 50 Australia March DT Inspiration


 Hi everyone welcome to any new visitors to my blog and welcome back my followers.
Today I'm sharing my design team layout for a wonderful word challenge over on Scapbooking Top 50 Australia. The word was 'SWEET' and when I found a photo of my beautiful grandchildren that was taken a couple of years ago the word that came straight to mind was "How Sweet" the way Imi was being so gentle and loving to her new little brother Zander, so I had to scrap this photo for this challenge. 
Enjoy seeing how I made this page.


Scrapbooking Top 50 Australia


Thanks to our amazing sponsor:
Recently Added 

Supplies I used include:

  •  12"x 12" 7 Dots Studio 'Domestic Goddess' page.
  • 'Wow' chipboard- Messy Square Frames- WOW2173
  • 'Mont Marte' modeling paste
  • 'Dina Wakley' white gesso
  • 'Finnabair' Mica powder - Pink 
  • 'Versa magic'- dew drop Red Brick
  • Pink Sherbet 'Tinby' Metallic Melts
  • 'Kaisercraft' 6 1/2" x 6 1/2" Paper pad- 'Enchanted Garden'
  • Brass bird and flower embellishments
  • 'StazOn black
  • 'Kaisercraft' and assorted flowers
  • Sweet - 'Typo' letters wood
  • Gauze from a kit in my paper stash.
  • 'The Crafters Workshop'- 'Be in Love" stencil 
  •  Spatula and paint brush.


  1. Mix 'Pink' mica powder into some modeling paste and using a spatula smear it over the love heart section of the stencil. In two sections on opposite positions on the paper. One larger than the other. Leave to dry.
  2. Paint the frame with gesso and when dry use Red Brick ink pad to colour the frame and quickly sprinkle 'Pink Sherbet' Metallic Melts on before it has a chance to dry. Use a heat gun to melt powder, you can add extra layers of this amazing product by sprinkling it on while the melted powder is still hot and then continue to use the heat gun until you are happy with the effect/coverage. 
  3. Glue photo to the frame.
  4. Create a stack of paper for behind the photo and frame using the die cuts and papers from the paper pad and glue under the photo and then glue to page.
  5. I painted some of my white flowers with a mix of water and Mica 'Pink'
  6. Add flowers and embellishments around the frame.
  7. Add a small group of flowers to small stencil area and place letters 'Sweet' onto the gauze and page and glue down. 
  8. Use left over watered down Mica 'Pink' to splat over the page, ensure you cover your photo with a scrap of paper to protect it.

Some Close Ups for you to see:


Thanks for dropping by to see my latest design team inspirational layout, why don't you join us over at Scrapbooking Top 50 Australia and join in the fun and enter our word challenge 'SWEET'


Sunday, 14 February 2016

Scrapbooking Top 50 February Mood Board Inspiration

As a design team member at Scrapbooking Top 50 Australia I was excited to be able to use my favourite colour to inspire you all with our great February Challenge. Well for those who know me it won't be a surprise that my favourite colour is 'Orange', this time I thought instead of making a primarily orange page I would use my fav colour as a technique teaching opportunity.  I have been experimenting with watercolours and how the different ways the paint react in different ways to paper and water. My daughter rang me the other day and asked if I could make her a couple of 21st birthday cards so I thought this was a great opportunity to share how I made my fav colour orange a centre piece using watercolour paints.


Scrapbooking Top 50 Australia

February Sponsor


Items used:
  • 2 pieces of White card cardstock
  • Molli & Mimi heart stamp kit. I used one of the large ones.
  • StazOn Ink for stamping and edging. (You could use 'Black soot' Tim Holtz Distress Ink for edging only not stamping as it is not waterproof another option would be Archival Ink as it is also waterproof).
  • Watercolour paints - brights (You can buy cheap ones but to get vibrant colours you need to high levels of pigmentation and these are normally a little more expensive)
  • Small Spray bottle filled with water.
  • Paint brush- medium size.
  • Palette tray may come in handy
  • Little Birdie Angel wings
  • 'Miss Empire' Kaisercraft 6 1/2" x 6 1/2" paper pad- die and paper
  • Chipboard key 'Little Birdie' 
  • Chipboard numbers
  • Twine - A friend of mine gave me a great idea; tie your twine around a gesso container to get the perfect circle that will stay that way, the bigger the container the bigger the circles. Do several and they will be ready when ever you want one.
  • White cheese cloth
  • Glossy Accents adhesive.
  • "Live in the moment" stamp from Kaszazz
  • DecoArt media white crackle paint 
  • Small piece of cardboard to place behind the heart and quote to give more depth to the look. 
  • If you want to put an age onto your card: you will need chipboard numbers, white gesso, MicaColor 'Vintage' Sparkling Mica and Pigment Watercolour paints


Many of items or similar can be purchased over at Scrapbooking Fantasies online store and to find out different lessons and product they have pop over to their blog/site by clicking on the link I have placed on their icon near the top of this page.


1. Fold 1 piece of card stock in half and crease edge to make card. The other is for stamping your heart on.
2. Cut chosen coloured paper for background and cut a piece leaving enough to leave a border of white.
3. Edge card, paper and die cut with Black StazOn / Archival ink / Distress Ink.
4. Stamp your chosen heart and quote stamp using StazOn / Archival ink, don' cut out at this stage.  
5. Paint the key with White crackle paint quite thickly and put aside to dry. It will develop a cracked effect as it dries.
6. Now for the watercolour fun:
  • Prime your brush with paint by adding lots of water to your paint and adding to your paint brush.
  • Remember water is your friend to allow it to spread you need lots of water.
  • Spray your stamped heart with a fine mist of water and begin to apply your paint in dabbling motions.

  • Have fun experimenting, add more water on your brush and spray again if you need it.
  • If you have large puddles of colours use a tissue or wetone to carefully absorb some of the moisture.

  • I painted red first and whilst wet I flicked yellow and orange onto the top so it would bleed to make my mottled orange effect. 


7. Cut out the quote and back with patterned paper from paper pad.
8. Cut a piece of cheese cloth that will fit onto the card behind the heart, distress it by pulling it out of shape and removing threads along the edge until you're happy with the look.
9. When dry cut out the heart. 
10. Assemble the card: using  Glossy accents or double sided tape connect green paper to white card and add die cut to the corner. 
11. Using a strong glue such as Glossy accents glue wings to either side of the heart, then stick down the cheese cloth, twine, quote, piece of cardboard and then the heart. lastly the key. Leave to dry.
12. If you want to put a number on it use chipboard numbers, prime the surface with white gesso, dry and then paint with a thick coat of  'Silver' metallic watercolour paints.


 Hope I have inspired you to try watercolours in your art work. it's fun and so unexpected as water colours do tend to have a mind of their own some times. Just remember that be patient watercolours take time. If you try and mix too many or the wrong colours together too quickly you could end up with a muddle puddle instead of a beautiful mix of colours. Most times it is really important to dry your work well before adding another colour. Time is also a watercolours best friend. Heat guns will provide a very different effect compared to drying it naturally as well. Thanks  for popping over to my blog, pop over to Scrapbooking Top 50 Australia blog or their facebook page and be inspired by others with fantastic ideas and techniques.

Sunday, 31 January 2016

Beach Escape- ARTastic Summer Challenge.

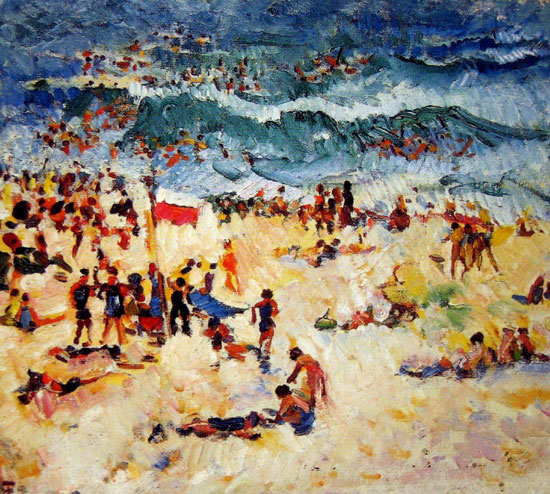
JANUARY inspiration is Bondi Scene by Isabelle May Tweddle.

ARTastic JANUARY inspiration is

 Bondi Scene by Isabelle May Tweddle.


I love' Summer', hot weather, swimming or just sitting down on the beach taking in the peace and quiet. Blue skies, white sand and good friends is the perfect combo on a summers day. I thought that using the watercolours would be perfect for this layout and the colours are chosen from the colours of our beautiful local sea at Beachport in Sth Australia.


Items I used to create this layout included:
  • 12" x 12" white card.
  • Kaisercraft chipboard letters.
  • Pages from an old book torn into small pieces.
  • Mont Marte Impasto to seal paper and glue paper over lettering.
  •  White gesso
  • Watercolour palette paints with high pigmentation (Brighter and vibrant colours)
  • Black acrylic paint 
  • Finnabair Mica Paints 'Pink' 
  • Kaisercraft collection 'Sandy Toes'
  • Sharpie pen for border and sketching around letters.
  • White cotton


 Thanks for popping over to see my entry in the ARTastic January Challenge. Hope you keep re-visiting my blog to see what I create next.

Scrapping Buddies- Scrap the Girls Jan Challenge.

I love this photo, Fiona and I going shopping for supplies to spend the evening enjoying our creativity and friendship together.


 Items used: 
  • 12" x 12" White Card Stock
  • Monte Marte Modeling Paste
  • Monte Marte Black Gesso
  • Kaisercraft 6 1/2" paper pad asssorted papers and dies from the 'Take Note' collection
  • Kaisercraft, Little Birdie and Prima flowers
  • Funky flairs 'Create' flair
  • Tim Holtz stencil 'Treads'
  • Brass elements
  • Black and white cotton twine
  • Kaisercraft script stamp
  • Old antique lace from my Nan's lace stash box.
  • Black Sharpie pen
  • Acyrlic paints; for grey shadowing and paint splats.


Thanks for dropping by and checking out my latest challenge entry for 'Scrap The Girls'.


Tuesday, 26 January 2016

White with Treetop Challenge- Treasuring Fun Together


Over the last year my husband and I have rekindled our love of geocaching. Armed with our GPS we travel around both interstate, in our state and our own community learning about new places, old places and places we didn't even realise existed; finding wonderful treasures along the way. There are so many caches out there and range from easy to very creative and difficult. We've climbed up cliffs, up mountain tracks, over rocks and into tree tops so I thought the beautiful 'treetop' green was perfect to use to create this layout.


Items I used included:
  • White 12"x12" card stock
  • Ranger Multi Medum Matte- to seal paper before adding paint.
  • DecoArt Media White crackle paint - painted onto the Imaginarium 'Thistle's board'
  • Imaginarium 'Thistle's board'
  • Paint used was Semco Acylic paints and Lindy Stamp Gang 'Starburst Color Shot'
  • Black  and white paper from my stash
  • StazOn black
  • Prima 'White Wire Thread'
  • Chipboard- small people, brackets and hash tags from my stash.
  • Mont Marte Black Gesso 
  • Donna Downey 'Painted Flowers' stencil
  • Indigo Blue 'Limor Circles' stamps
  • Feathers collected on one of our geocaching searches.
  • Black permanent ink pen - fine 
  • Black cotton


Closeups:


Hope you enjoyed looking at my latest layout and will drop back to see what else I have done.


Monday, 25 January 2016

Off the Rails Scrapbooking- January Mood Board Tutorial

Making cards is an great opportunity to practice techniques and experiment with a range of product and at the end you have a special and unique card to give to your friends and family. Here is a quick card that I made within half an hour with a technique my amazing scrapbooking and camping buddy Fiona Paltridge showed me in a layout workshop early last year. I love taking any opportunity to attend workshops and events where I can learn and be inspired by fellow scrapbooking and card makers.
This is my take on the Off The Rails Scrapbooking January Challenge Mood Board and I would also like to take the opportunity to thank Narelle from Simply Stamping for sponsoring this month challenge. I didn't get a chance to order any any up to date Stampin' Up stamps but I did have some that I had purchased a while ago so jump over to Narelle's website and see the amazing new products she has available to purchase, I know I will be getting some soon.

www.offtherailsscrapbooking.blogspot.com.au
Off The Rail Scrapbooking January Mood Board

January Challenge Sponsor.


Items used include:
  • 1 piece White 'Card' stock
  • 1pc of scrap white card to stamp onto.
  • Stampin'Up 'Friend' stamp from 'Looks like Spring' set.
  • 'Enjoy the Little Things' 12"x 12" paper
  • Deep red card- small piece to be torn to back Friend stamp.
  • Ranger 'Glossy Accents'
  • A range of washi tapes in different colour and patterns
  • White gesso
  • IndigoBlu 'Ink splat' stamp set 
  • Black StazOn Ink
  • Black leather strapping
  • Coloured beads
  • Large Pattern Button.
  • Wet Ones 
  • Magic mount from Kazass, if you haven't go Magic Mount small pieces of cardboard from a box will do the same thing.


Step 1. Fold card stock in half and crease edge to make lay flat.

Step 2. Cut a piece from the 12"x12" paper to fit onto the front of the card leaving a small white border.


Step 3. Choose a colour washi tape and begin tearing strips of washi tape off the roll, continue to tear each piece into thinner strips and lay onto one of the long edges of the card in random places, overlapping the pieces and repeat this technique in a small area on the bottom right hand corner.  Repeat this with the other colours and patterned washi tape until you are happy with the effect.


Step 4. Placing small amounts of white gesso on your finger, smear the gesso over the tape and just over the tape edge in a gentle rubbing motion. Using a wet one wipe off excess and in areas that you want to see the patterns and colours more and to soften the edge of tape where it joins with paper. Do each of the areas separately to ensure the gesso doesn't dry too much.


Step 5. As it dries you can  stamp the 'Friend' stamp onto the scrap white card stock with Black Staz On ink and cut it out.

Step 6. Tear a piece of red card to fit behind the stamp, place a magic mount behind cut out stamp and stick to red card.

Step 7. Thread the beads and button onto the strapping.

Step 8. Using Black Staz On ink and 'ink splat' stamp, stamp your splats where you think they would look the best to balance the look of your card.


Step 9. Glue on your bead/button strap with a strong glue like 'Glossy Accents'. I placed some magic mount under my button to hold it in the place and flat. And glue 'Friend' stack down onto the small tape area.


Step 10. Edge the card with Black Staz On Ink to finish the card.


Here are some closeups for you:


Hope you enjoyed this tutorial and pop over to the Off The Rails Scrapbooking page and check out more pieces that will inspire you to have a go at scrapbooking, card making and hopefully to enter our latest and future challenges. 

I can't leave without a big thank you to Fiona Paltridge for inspiring this piece with her technique she taught me  you can visit her by visiting her at Pastiche Scrapbook Studio.