Saturday, 30 May 2015

Kraft+ May Challenge.


I'm again inspired by Kraft+ to enter their current challenge. Many years ago I brought a scanner to scan the old family slides so I could keep a copy of them safe. It was so much fun reminiscing of our life growing up. I printed some of them off and hadn't found the right time to scrap them. As soon as I saw the Kraft+ mood board it reminded of the era that I grew up in, so here is my take on it.


Kraft+  May Challenge.


The items I used included:
  • Kraft paper 12" x 12"
  • Monte Marte 'Impasto' medium to seal page.
  • StazOn Ink 'Jet Black'
  • White Gesso to soften the edges of the paper and washi tape
  • Dylusions Ink; 'Black Marble' and 'White Linen' for ink splatting.
  • Cork love hearts
  • Washi Tape
  • Pack of bright beads
  • Jewelery bead and leather strapping
  • Jute strap and string.
  • Old wall paper.....lol from off my walls after renovating our first home in the 90's
  • Funky Flairs' Combi Van'
  • 'good times' 2Crafty chipboard
  • Indigo blue stamps 'Ink Splats'
  • Sharpie fine pen for border and around love hearts
  • Black Cotton 
 Here are some close ups for you to look at.


Thanks for coming over to see my entry to this months Kraft+ Challenge if you have any questions on how I have done any parts of my page please feel free to leave me a comment. See you next time.

Scrap Around The World May Challenge.


My beautiful grandie turned 4 in January and I've been waiting for just the right challenge to do a layout of her opening her present from her great Nanny (My mum), a 'Frozen' snow globe. She was so enthralled in it she stared at it for ages and without looking away said "Thank you Great Nanny..it's just beau...tiful". LOL. I think she loved it.

Scrap Around The World May Challenge Board


These are the products I used:
  • White 12" x 12" 
  • Lace doily sticker.
  • Washi Tape (Brought overseas) 
  • 'Bubblegum' Dylusions ink
  • Piece of old lace from my grandmothers stash
  • 'Poppy Collage' stencil by Donna Downey.
  • Tags and assorted papers from my stash
  • 'Love it', 'polka a dot' buttons
  • Kaisercraft flowers
  • Monte Marte Modeling paste
  • Impasto Monte Marte
  • A bit of bling sparkles
 I usually do a bit of a description on how I do my layout but have run out of time this time to enter this amazing challenge. 
Here are some close ups for you to check out.


 Thanks for dropping by to see my blog, if you have time check out some of my other layouts while your here. Hope I can inspire you like others do for me.

White with Rasberry May Challenge.


The inspiration I had for this layout was a from a photo that I took of my scrapping buddy including my grand daughter in creating  patterns for a background using Modeling Paste and a stencil. Imi was fascinated in what Fiona was doing and asked if she could do it too. "Of course you can" Fiona said and so the creating and discovery began.


The items used in the layout include:
  • White 12" x 12" paper stock
  • Monte Marte Impasto medium
  • Monte Marte Modelling Paste
  • A mix of Semco acrylic paints to produce a raspberry coloured paint.
  • Stencil by 9"x 12" 'Stencil Girl'
  • BeckBT's 'Red Velvet' Metallic Melts: 'Tinby Designs'' (I received this amazing product for winning 2nd White with Celosia Orange)
  • 'Old Rose' Versa Color ink pad
  • White acrylic paint.
  • Journaling pen.
  • 2Crafty 'Hexagon' chipboard.
  • 2Crafty 'Bubble Reed' chipboard
  • Bird Chippies from my stash
  • Heart flair from 'Funky Flairs'.
  • White cotton
  • White cheese cloth.
  • Black card to back my photo
  • Small piece of card to lift the photo to give some depth to the layout.

I firstly sealed my page with Impasto medium, it helps keep the paper white in photography. I chose the words I wanted from the stencil and carefully placed paste over each one. It is a good idea to wait for each one to dry before doing the next. It's possible to do as I found but can be very tricky to keep the stencil off the previous one and not smudge it.


While I waited for the paste to dry I mixed the paint to match the swatch on the White with 1 banner. The photos haven't shown the true colour which is very frustrating as I mixed alot of combos until I was happy with it.  I used 'Old Rose' Versa Color to ink the the bird chippies and the 'bubble reed' chipboard and while it was wet I sprinkled on the Red velvet Metallic Melts (I found this combo made a beautiful raspberry colour) and melted them with a heat gun I painted the 2Crafty hexagon chipboard with white acrylic and laid all of the pieces to one side. Watering down my 'Raspberry' paint I added the paint gradually to my page and held the paper up right in different directions to make it run. When it was dry I used a damp wet one and gently wiped across the paint which gave it a weather look and with the journal pen I traced the letters to make the words stand out


Time to assemble the rest. I added the raspberry chipboard/chippies then the cut up white hexagon chipboard, the cotton went on next with the distressed edged cheese cloth on top. Backing the photo with black cardboard tied the black and white photo and the writing together and to finish it off I added one of my new 'Funky Flairs' heart flairs. 

Thanks for popping over to visit my latest White with 1 entry. Hope you enjoyed my take on the colour 'Raspberry'.


Saturday, 16 May 2015

OTR May Mood Inspiration Layout.

Welcome to my Inspiration Layout for Off The Rails Scrapbooking May Challenge using the magnificent Mood Board.

Sponsor for the Month - May
  May Challenge Board       

I think we should all take the time to be kind to ourselves and sit back and relax, I love going camping and sitting back after a big day of scrapping, reading and chatting with my hubbie and camping buddies. My scrapping buddy and I call it 'Scramping'. So at the end of the day when the light runs out we sit back in front of our camp fire with a good wine and relax some more.


List of items I used:
2Crafty chipboard disc word set 2& 6" circle revolution chipboard painted with black acrylic paint.
Acrylic paint: mix to make the above colours in the colour palette to use behind the photo.
Cork Chevrons- Studio Calico (Painted black)
Old Dyno label maker with black tape: for title "Be kind to yourself"
Kaisercraft 61/2"x 61/2" pad- Sandy Toes (Tear to obtain white edging) and scrap paper from my stash.
Kaszazz black and white Alpa stickers
Gesso-white- use over paint to soften and blend to compliment background paper.
Large button embellishment (I brought at Melbourne's Paperific Expo, If you get a chance, go and check out the next one later this year, it's fantastic ).
12"x 12" weathered boards paper from my scrap collection from over the years of I love that paper and never used until now.


A Huge Thanks to 2Crafty for Sponsoring our May Challenge if you haven't used their fantastic products you need to but some asap, I love using their products in my layouts whenever I can.

Thanks for coming over to see my Inspiration Layout for May. Jump over to the Off The Rails Scrapbooking Blog or facebook page and check out the other inspiration pieces of art by our amazing Design Team Members.


Wednesday, 6 May 2015

May Inspiration Tutorial - Off The Rails Scrapbooking


 Hi it's tutorial time again. With Mothers Day upon us and my mum loves flowers and butterflies I thought I'd make her this card for my Design Team Tutorial Piece for Off The Rail Scrapbooking, using our  May Challenge mood board.
Sponsor for the Month - May 
Latest Mood Palette


Items I used include:
 White Card Stock from Kaszazz
 Piece of brick pattern paper from Kaisercraft 6x6 collection pad
Chipboard from '2Crafty': Butterflies and Interlocking Grid
StazOn ink- jet black
Washi tape- birds on a wire 'Kaszazz'
Dylusion inks
Mont Marte Modeling paste
A range of acrylic paint  colours to match mood palette.
Tinby Metallic Melts: Copper, Red Velvet, First Light, Glistening Snow
Versa Color ink pads: Copper, Silver, Old Rose,Atlantic, Black,
Watermark embossing ink pad by Tom Boss
Prima Flower, Kaisercraft flowers and a range of flowers from my stash.
A large gold leaf brought from a local jewellery maker shop.
The Crafters Workshop 6"x6" stencil

 Firstly I folded the card stock in half and then painted around the outer edge (approx 2.5cm) with black acrylic
paint.

Tear a piece of brick wall paper to fit over the white area ensuring you overlap it slightly over onto the black painted area.


I love using 2Crafty chipboard as it has a huge range of chippies for every occasion. One of their new sets is the Interlocking Grid which I thought was perfect as it looked similar to trellising, so I selected the section of the grid I wanted and cut it to the shape I wanted.  I covered the chipboard with some Versa Copper and Silver and working quickly then sprinkled some Tinby Metallic Melts 'Copper'. Melts are different from other embossing powers with bigger crystals, which can give a fantastic rustic finish and can be layered in sections over each other to achieve amazing results. This is the first time I've used them and have fallen in love with these.


I seem to have misplaced my close up of the metallic melts on my little butterfly but I had recently been playing with other butterflies and metallic melts so I will show you it so you can see what the melts look like prior to heating with a heat gun. With this butterfly I had painted it and then added Watermarking embossing ink onto it before sprinkling the gold melts onto it. 
The melts are opaque so they are affected by the ink used beneath it. 


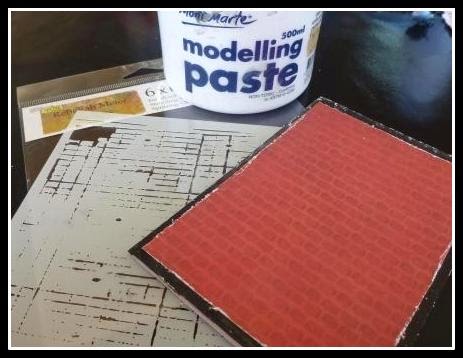
Placing the Rebekah Meier 'The Crafters Workshop' stencil onto the brick paper I used a spatula to spread the modeling paste over. You can use a heat gun or grab a coffee while you wait for it to dry. 


I added another small piece of torn paper and glued it onto the backing paper. Then used StazOn jet black and the Kaszazz stamp 'Radio Newsprint'


Using a selection of gorgeous flowers, a circle of string washi tape 'birds' and embellishments such as stars and hearts clip and paper flags from 'Kaszazz', a gold leaf and our embossed butterfly I decorated the card. I twisted the stems of the flowers to provide extra dimension.

I hope you enjoyed reading my tutorial, A big thankyou to 2Crafty for sponsoring this months Challenge. If you haven't use 2Crafty products yet I recommend you head over to them and check out their products.

Saturday, 21 March 2015

White with Hemlock March Challenge.

Being restricted to using one colour and 70% white on a layout can be very challenging and one of my favourite ways to challenge myself. This month over at White with 1 they have chosen 'Hemlock'.


As I do not have this colour in my paint stash I experiemented with modeling paste and paint and wasn't happy with the finished colours. I have wanted to try gelatos from Faber Castell for quite sometimes and was very excited to discover Big W was selling them in their catalogue. I brought several packs and discovered that 'Acqua Dolce' was a perfect match.

So this is what I created:


Items I used included:
  • White 12" x 12" paper stock.
  • Crafters Workshop stencil 6" x 6" 'Mini tile texture'
  • Faber Castell Gelatos 'Acqua Dolce'
  • 6" Glitz paper park 'Unchartered Waters'
  • Washi tape 'Film strip'
  • Francheville 'Rainbow enamel sticker-black' dots
  • Kaisercraft 'Curiosity' Collection - 'Love'
  • Chippie letters
  • Gesso - White and Black
  • Jewelery element from local shop in Beachport 'Coastal Elegance'
  • 'Enjoy the little things' strip from a piece of Kaisercraft paper edge.
  • Francheville circlular Stickers.
  • Lace sticker tape from my old stash.

Firstly I used my new Mini tile texture stencil to place modeling paste in 3 sections on my white paperstock, when dry I rubbed the gelato stick over the areas and blended the colour with my finger. I then added my washi tape to the layout. I painted my chippies with  white gesso and then used my gelato again to match the stenciling.

I placed my photo of a beautiful church in Cortina d' Ampezzo, Italy onto a piece of cardboard to lift it for added dimention and height, then added my strip 'enjoy the little things' , torn pieces of Glitz paper  to back my photo and piece of jewelery and a circle coloured with gelato. Pieces of lace stickers were added behind the photo as well. To finish off my layout I added splats of black gesso I had watered down and black and white enamel dots.

I hope you are inspired by my take on White with 1 Challenge for March 'White with Hemlock', I recommend that you head over the the blog and check out the amazing design teams inspiration and the artists entries.

Kraft+ March Challenge

Kraft paper is definitely a new and challenging to use, so practice hopefully makes perfect layouts.
This month the challenge combines a sketch and 'All That Glitters'


Kraft+ March Challenge
Here is my take on the challenge:


Items I used included:
  • The cut off strip sections of the 12"x 12"Kaisercraft Papers:'Tiny Hearts', 'Butterflies', 'Pin stripes
  • 'Tim Holtz stencil 'Dotfade'
  • Impasto gel medium to seal Kraft paper to ensure crisp colours and minimise paper curling.
  • Modelling paste with Semco Acrylic paint 'Vividian' mixed in.
  • 'SnapShots' from Kaisercraft 6"x 6" 'Sandy Toes' Paper pad.
  • Film strip washi tape from Kaszazz
  • Gold heart from a local shop in Beachport 'Coastal Elegance' where you can buy jewelery making elements, jewelery, accessories and I can buy more scarves to satisfy my scarf addition.
  • 'Rainbow enamel sticker dots- black' Francheville
  • Some blue rhinestones from Kaisercraft
  • Kraft 'Tags and Rope' from Francheville.
  • Kraft and Cork Collection from Francheville- Cork frame.
  • 'Barn door' Tim Holtz Distress Ink
  • Rub ons from one of my many collections from Kaisercraft
  • Sharpie fine for border doodling and words.
After sealing the paper with Impasto gel medium I placed the stripes across the page using the film strip washi tape between each. Then I used my 'Fadedots' stencil with the mixed modeling paste to place colour and texture to the page.

While the paste was drying I decorated my tag edging it with 'Barn Door' distress ink and placing on my rub ons, writing and tying on the heart using the rope from the tag kit.

 I cut my large photo in half and then backed each of the photos with paper from 'Sandy Toes' papers and some black card and placing them on angles gave the layout more direction showing them having fun together running down the sand dune. 

To finish my layout I added a cork frame with the arrow 'Snapshots', adding extra rub ons, rhinestones to depict the ocean spray and used my fine 'Sharpie' for the writing and border doodling.


Thanks for coming over to my blog and seeing one of my newest challenge entries.

For more ideas jump over to Kraft+ and see the amazing inspiration they are providing in using Kraft paper.