Saturday, 21 March 2015

Kraft+ March Challenge

Kraft paper is definitely a new and challenging to use, so practice hopefully makes perfect layouts.
This month the challenge combines a sketch and 'All That Glitters'


Kraft+ March Challenge
Here is my take on the challenge:


Items I used included:
  • The cut off strip sections of the 12"x 12"Kaisercraft Papers:'Tiny Hearts', 'Butterflies', 'Pin stripes
  • 'Tim Holtz stencil 'Dotfade'
  • Impasto gel medium to seal Kraft paper to ensure crisp colours and minimise paper curling.
  • Modelling paste with Semco Acrylic paint 'Vividian' mixed in.
  • 'SnapShots' from Kaisercraft 6"x 6" 'Sandy Toes' Paper pad.
  • Film strip washi tape from Kaszazz
  • Gold heart from a local shop in Beachport 'Coastal Elegance' where you can buy jewelery making elements, jewelery, accessories and I can buy more scarves to satisfy my scarf addition.
  • 'Rainbow enamel sticker dots- black' Francheville
  • Some blue rhinestones from Kaisercraft
  • Kraft 'Tags and Rope' from Francheville.
  • Kraft and Cork Collection from Francheville- Cork frame.
  • 'Barn door' Tim Holtz Distress Ink
  • Rub ons from one of my many collections from Kaisercraft
  • Sharpie fine for border doodling and words.
After sealing the paper with Impasto gel medium I placed the stripes across the page using the film strip washi tape between each. Then I used my 'Fadedots' stencil with the mixed modeling paste to place colour and texture to the page.

While the paste was drying I decorated my tag edging it with 'Barn Door' distress ink and placing on my rub ons, writing and tying on the heart using the rope from the tag kit.

 I cut my large photo in half and then backed each of the photos with paper from 'Sandy Toes' papers and some black card and placing them on angles gave the layout more direction showing them having fun together running down the sand dune. 

To finish my layout I added a cork frame with the arrow 'Snapshots', adding extra rub ons, rhinestones to depict the ocean spray and used my fine 'Sharpie' for the writing and border doodling.


Thanks for coming over to my blog and seeing one of my newest challenge entries.

For more ideas jump over to Kraft+ and see the amazing inspiration they are providing in using Kraft paper.


Sunday, 15 March 2015

Off The Rails Scrapbooking March DT Inspirational Layout

Hi everyone, This month is my turn to share some more inspiration using the wonderful mood palette and sketch from the Off The Rails Scrapbooking. The challenges can also be challenging for both the design team and the people entering the challenges.  These colours are not ones that I use very often or choose and so I found this one a little difficult to begin but the sketch and palette was a great inspiration and I really enjoyed the experimenting process and using my new resources. I am very happy with what I designed and hope you love it to0.


March 2015 Inspiration and Mood palette  and Sketch.


List of the resources that I used:

12"x12" white card stock coated with Mont Marte 'Impasto' medium
 Mont Marte White Gesso and Modelling paste
Kaisercraft 'Hello Today' 6"x 6" paper pad
'Creativ' small paper doily
Stencils: Donna Downey 'Scribble Script' and The Crafters Workshop 6"x 6" 'mini chicken wire'
2Crafty 'Chicken wire panel' chipboard.
2Crafty line words 'Good Times'
Franchville 'Yellow' Enamel stickers 
Tim Holtz Distress Inks 'Linen Antique', 'Vintage Photo'
Dylusions Stain 'white linen', 'black marble', 'Lemon Zest'
Acylic paint- 'Titanium white' ' Raw Umber'
Washi Tape assorted- Kaszazz
Studio Calico- Wood Veneer 'cameras and people'
Assorted flowers
Old lace from my Nan's collection
Black cotton


After sealing the white paper with 'Impasto' I used distress ink 'Vintage Photo' with the ' mini chicken wire' stencil in selected places on the page. Choosing a selection of papers from the 'Hello Today' Kaisercraft papers and tore them into strips and squares, I stuck them on along with some washi tapes before using a spatula to glide some white gesso over the sections.. I glued them onto the paper and then cut up the 2 Crafty chipboard Chicken wire panel into smaller pieces.  


I used my new Donna Downey Stencil 'Scribble Script' to add  modeling paste with Raw Umber mixed into it onto the page.
I added a piece of scrap cardboard at the back of the photo (My dad and Me when I was very young) to lift the photo and give more dimension, adding a small piece of lace I found in my Nan's (my dads mum, the photo was taken in her garden) onto the bottom edge.


I used both 'vintage photo' and 'linen antique' distress ink to age the very white paper doily.
To finish off the page I added lace and paper flowers, wood veneer people and camera, the word 'Remember' from 2 Crafty and enamel dots. Finally I splatted the page with 'Lemon Zest', 'White Linen' and 'Black Marble' Dylusions Ink.

I enjoyed doing this paper and using some of my new resources that only arrived the day I was planning to do this layout, no wonder I was having trouble getting started I didn't have all of my resources in my craft room. Thanks for popping by Off The Rails Scrapping Blog and coming to see my latest layout, I hope you find the challenge as inspirational as I found it.


Friday, 6 March 2015

Off The Rails Scrapbooking March Tutorial- Chocolate Box

Easter is coming up and of course everyone loves chocolate. If you are making your own chocolates which I love doing what better way to give them to your loved ones than in a box that has been personally decorated by you. This is what I've done and would like to share how I did it.


Firstly I found a small box from my recycling box and chose a textured paper from the Mix'd Media Stax 2 from Donna Salazar designs paper pad and cut it to cover the lid of the box. I also chose some pale blue lettering stickers from Creativ.


After gluing it onto the box I cut a small paper doily from the pack of 3 size doily from Creativ in half. Using Tim Holtz Distress Ink 'Vintage Photo' and 'Linen Antique', I blended each ink over the doily to give it an antique lace effect and glued it down onto the corner and it's sides.


 I chose several pieces of paper from the Kaisercraft 'Hello Today' 6"x 6" paper pad and tore them into strips and glued them vertically onto the top. The flower and butterfly washi tape I placed horizontally was from Kaszazz.


 The next set of resources I sourced was Mont Marte White Gesso and Modelling Paste, Jo Sonja's acrylic paint 'raw umber', 2 Crafty 'mini chicken wire' chipboard, Prima stencil 'stone wall' and a WOW chipboard 'Mini Messy Rectangle frame'.
 

Using my wonderful new spatulas given to me by my amazing friend "Thanks" I smeared some White Gesso over the top of the strips and washi tape to blend and soften them. Mixing the paint with the modelling paste I applied it over my new Prima stencil onto my box. While they was drying I painted the chicken wire chipboard and messy rectangle with the 'raw umber' paint.


The next group of items I collected to use included a butterfly from the Kaisercraft collectibles 'Curiosity', Franchville enamel dots 'yellow' and 'black', Green Tara Water Hyacinth twine, Prima and Kaisercraft flowers and some black cotton.


Some of the flowers I left white, and some were painted with Dylusions Spray Ink 'Lemon zest' mixed with 'White Linen' and 'Bubblegum Pink' with 'White Linen'.


After alot of experimenting with placement I decided that more chicken wire was needed and a few more flowers as well and this was my final placement and finished box.


I hope you have enjoyed reading my tutorial, been inspired and take some time to read other artists amazing tutorials and gorgeous layouts at Off The Rails Scrapbooking. 


Thursday, 26 February 2015

'Tranquility in the centre of town"

I love photography and my daughter (a few years ago) said she would pose for some photos when we had the time, so one day we made time after a highland dance class and I took some photos of my daughter  in a parkland area in the middle of town. It was so tranquil, you forgot that the busyness of the town that was just a stones throw away. When I saw the 'Scrap Around the World' February Mood board I knew it had been the perfect challenge and opportunity to scrap it. The colours were perfect and the tranquility in nature that was portrayed in the photos fit perfectly with what I envisioned for this photo. I chose to use a 8"x 8" canvas as my base so I could hang it to share it with my friends and family.


Anything Goes- February 2015 Challenge.
I also decided that I would also enter this canvas into the 'Another Freaking Scrappy Challenge' February Challenge  as I have been watching this site for a while and had being inspired by the design team artist and up to now haven't had the opportunity to enter.


 Items used included:
8"x 8" Canvas from Cheap as Chips
Mont Marte White Gesso, Impasto
Acrylic paint: white, Black, Mint, Brown, White and Green
2 Crafty Chipboard- Interlocking grid pattern
Twine
Mixed size assorted flowers and leaves
Small glass bottle
Beads and glitter mix
Embellishment button
gcd Studios- Mix'd media paper stax2
Stencil

Firstly I layered white gesso thickly to give the canvas texture, then added a layer of  the 2 shades of green being scrapped on with an old rewards card as a scrapper, and then another layer of white gesso. I mixed some of the beads and glitter mix in with lots of 'Impasto" and then using a spatula I spread the 'Impasto' mix over the stencil. I sped up the drying process with my heat gun. With a small needle nosed bottle with a mix of Impasto medium, paint (mint and black) and water I made swirls and splotches over sections of the canvas.
As I waited for it to dry, I painted the chipboard with brown, black and white acrylic paint, and cut a piece of twine to make my circle which I will place behind the photo.
After placing the assorted flowers and leaves together and gluing them down I used the mint acrylic paint to paint all of them, using the brighter green to add some colour depth and then when dry, dry brushed some white gesso onto some areas to give the flowers some highlights. I added some small white fine foliage, and added some green paint into the bottle, painting some gesso onto the outside to give an aged appearance, and then glued it into place.
After adding the twine and gluing the chipboard down I glued some thick cardboard behind my matted photo so to give it height. I painted some white gesso and mint paint onto some torn mix'd media paper and stuck it behind the photo too. To finish off my canvas I added a 'life' button embellishment and some extra beads and glitter around the edges of the flowers and chipboard.


Thankyou for coming over to see my challenge entries for "Scrap Around the World" and " Another Freaking Scrapping Challenge" I really enjoyed doing these challenges and being inspired by all the amazing artists/ design teams on these blogs. Also a big thanks to Fiona Paltridge who has been inspired my scrapbooking for a long time.


Wednesday, 25 February 2015

The Dynamic Duo- 1-2-3 challenge February layout

My Scrapbooking buddy Fiona and I enjoy getting together when ever we can, sharing a glass of wine with assorted cheeses, scrapping and camping to name a few, so I thought the 1-2-3 Challenge this month was the perfect opportunity to scrap a canvas of us together, The Dynamic Duo.


Items I used included:
Canvas from Cheap as Chips
Dylusions Ink: London Blue, Postbox Red, Lemon Zest, Black Marble
Kaisercraft chipboard letters
Old Dymo labeller- black tape
Cork Chevron Arrows- Calico Studio
Washi tape assorted
Stencil- Donna Downey 'Poppy Collage'
6"x6" Kaisercraft paper pad.
Mont Marte Modelling paste and White Gesso
gcd Studios- Mix'd media paper stax2
DIY Shop cork hearts
Black cotton
Ultra fine black Sharpie marker.
Glitter Ice Stickles from Kaszazz
 

Firstly I sprayed the top of my canvas with water before spraying each colour individually, to make each run down the canvas the way I wanted I sprayed extra water if needed. When dry I turned the canvas and using  a spatula I smeared modelling paste over my newest stencil.
The next layers added were the strips of washi tape which I softened with white gesso and the mounted selfie photo of Fiona and I took on one of our cheese and wine nights onto paper from the 6"x 6" papers and a piece of torn dictionary paper from the Mix'd media staz2 collection (I used 'London Blue' to colour the edges).
The cork heart and chevron arrows were painted  with Dylusions ink 'Postbox Red'/ 'Black Marble'. As the with the word 'Duo' after covering it with white gesso first to ensure the brightness and same effect as the background. When the heart was dry I covered it with Glitter Ice Stickles.
 To finish off the canvas I traced around the heart and word with the Sharpie marker adding squiggles etc.


Thanks for coming over to check out my canvas, this was my first ever canvas and I thoroughly enjoyed making it and look forward to doing my next one.


Wednesday, 18 February 2015

WW1’s February Challenge with Celosia Orange!


 Orange is my favourite colour, and my grand daughter loves to take photos, you guessed it my camera is also orange. Imi always asks if she can use my camera, I love seeing her looking through the lens of a camera, taking snap shots of the things in her world. It's amazing to see her zoom in close to see the tiny details and learning all about the art of photography.

White..with 1


List of the resources I used:
Monte Marte Modeling Paste, White Gesso and Impasto
The Crafters Workshop 6"x 6" 'Mini Viva La Art' stencil
Mix'd media Stax 2 Donna Salazar designs papers
 Kaisercraft Collectible die cuts 'Mister Fox'
Dylusions Ink 'Tangerine Dream', 'White Linen' and 'Black Marble'
Stamp 'Reason/Season' Kaszazz
Staz On- Black
Studio Calico Wood Veneer Cameras and People

I sealed my paper with Impasto first, I find this helps keep the white paper stay white when I photograph my paper and my ink and paint spreads well.  Using my 'Viva La Art' stencil I placed modeling paste over it with a metal spatula from my wonderful new metal spatula set. When dry I used 'Tangerine Dream' across the top of my paper making it spread and drip by spraying it with water.

I stamped sections with my script stamp and then painted my wood veneer people and cameras with white gesso and 'Tangerine Dream'. While they dried I tore some paper from my Mix'd media stax 2 paper and also painted it with white gesso as it was originally of an antique colouration. I gave my photo a small black matting and cut a small piece of cardboard and glued it on the back to lift it off the page to give more depth to the layout.
I placed the paper behind the photo, place my cameras and people in a random pattern around the photo and then added my 'Life' photo wheel. To finish my layout I splattered some 'Black Marble' and 'White Linen'.

Thanks for coming to see my "Life Art" entry for White with 1 - White with Celosia Orange. I loved making this page from the photo editing for my photo to the use of different elements I used.


Monday, 9 February 2015

Off The Rails Scrapbooking January Tutorial- Paperbag Gift Bag.

I always forget my shopping bags when I go to the shops (here in South Australia we have to supply bags or get charged for plastic or paper bags), so I have accumulated quite a few paper bags over the last year. This Christmas I decided to make gift bags instead of using wrapping paper (they can be seen on my blog), here is my tutorial on my Paperbag Birthday Gift Bag version.


I started finding the products I needed:
 Stencils: Tim Holtz 'Arrows' and The Crafters Workshop 'Mini Kaleidoscope' .
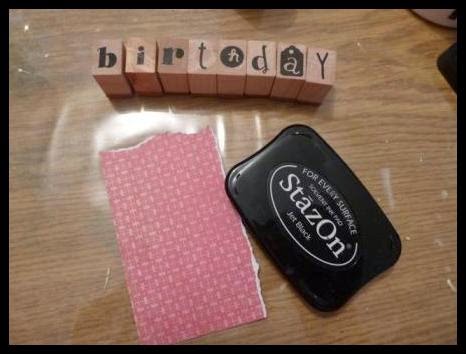
Stamps: Prima rectangular stitching, Alphabet blocks brought from Lincraft and 'Season' from Kaszazz.
 Mont Marte Modelling paste
A selection of scrap and 6"x6" papers: Kaisercraft 'Kaleidoscope' and 'Random' Crate Paper Co
Ranger Glossy Accents
Staz On Jet Black Ink pad
Dylusions Ink Sprays: Lemon Zest, Bubblegum Pink and Crushed Grape. White Linen and Black Marble.
Distress Inks: Antique Photo, Black Soot and Peeled Paint.
and of course 
a paper bag.


Using the Dylusions spray inks I randomly sprayed ink over the 'mini kaleidoscope' stencil which I had placed on the top right hand part of the paper bag. I removed the stencil carefully and dried the ink with a heat gun. Replacing the stencil slightly off centre to the previous position I spread modeling paste over the stencil this time.


I chose a range of papers from my 6"x6" paper pads from Kaisercraft 'Kaleidoscope' and Crate Paper Co. 'Random Collection' and die cuts from one of the Kaisercraft collection and tearing pieces layered them using magic mount to raise the bird, 'love' die cut and words to give more depth and dimension.
I also used black and white cotton twine to frame the words. and curved the butterfly's wings to give it more dimension


Using the 'Peeled paint' distress ink to add colour to the modeling paste and with the 'mini kaleidoscope' stencil to add to the background behind the layered papers. I used the 'Antique Photo' to edge the layered papers section.


Using the wood block stamps I stamped 'Happy Birthday'  with Staz On onto torn pieces of the pink paper I had used on the layered section and edged it with 'antique photo'


I used the Tim Holtz 'Arrows' stencil and Distress ink 'Black Soot' to add chevron arrows to the background, also used the smallest 'rectangular stitching' stamp and Staz On and the 'season' Kaszazz stamp to add more depth. I place some black cotton on the bag under the layered paper and after gluing the paper down I splattered the 'Bubblegum Pink', 'Black Marble' and 'White Linen' to finish the bag.


Hope you enjoyed reading my Paperbag Gift Bag tutorial for Off The Rails Scrapbooking. Next time you get a brown paper bag have a try in making an unique gift bag for a friend or family member or maybe you can think of another way to re-use a paperbag.